更新时间:2022-12-22 11:04:23浏览次数:679+次
本文介绍如何使用Multipass在Linux和macOS上运行Ubuntu虚拟机。该工具可以方便地为普通用户、开发人员和系统管理员创建和启动Ubuntu虚拟机。使用Multipass,可以从本地计算机直接将命令运行到VM的shell中。此外,还可以装载主机系统的目录并与VM共享文件。
步骤1:在Linux和macOS上安装Multipass
1、在Linux上安装Multipass
在Linux上,Multipass作为snap包提供。它可以很容易地安装在任何支持snapd的Linux发行版上。
在Zorin OS、Solus 3和Ubuntu 16.04 LTS版本等一些发行版中,snap作为预装应用程序提供。您可以按如下方式安装snapd:
###On Debian/Ubuntu
sudo apt install snapd
###On RHEL 7/CentOS 7
sudo yum -y install https://dl.fedoraproject.org/pub/epel/epel-release-latest-7.noarch.rpm
sudo yum -y upgrade
sudo yum -y install snapd
###On Rhel 8/Centos 8/Rocky Linux 8/Fedora
sudo dnf -y install https://dl.fedoraproject.org/pub/epel/epel-release-latest-8.noarch.rpm
sudo dnf -y upgrade
sudo dnf -y install snapd
然后按如下方式启用snapd:
sudo systemctl enable --now snapd.socket
sudo ln -s /var/lib/snapd/snap /snap
安装并启动snap后,我们将使用以下命令在任何Linux发行版上安装Multipass。
首先,更新和升级您的系统。然后在Linux上安装Multipass,如下所示:
sudo snap install multipass
如果由于任何原因无法运行以上命令,请尝试使用以下命令安装Multipass:
sudo snap install multipass --classic
成功安装Multipass后,您将看到以下输出:
multipass 1.10.1 from Canonical installed
2、在macOS上安装Multipass
在macOS上,有多种方法可以在系统上安装Multipass。
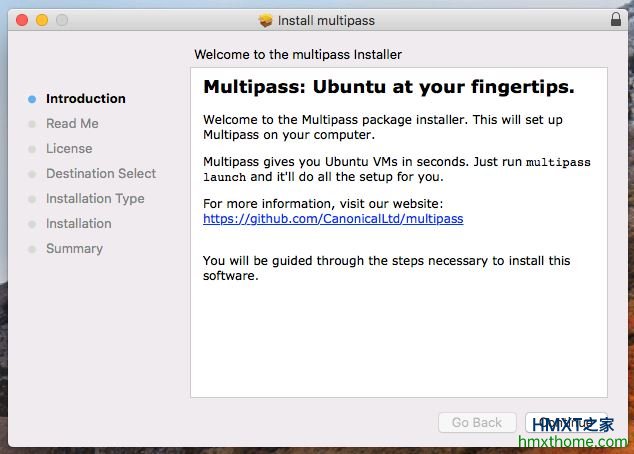
1]、使用Multipass安装程序
从官方下载页面下载Multipass安装程序,地址在https://multipass.run/,然后安装它。下载了.pkg软件包后,通过激活它将其安装在macOS系统上。使用管理员权限完成所提供的步骤:
2]、使用Brew
使用Brew,您可以使用以下命令在macOS上轻松安装Multipass:
brew install --cask multipass
在macOS上,Multipass支持VirtualBox作为虚拟化提供商。如果要使用VirtualBox,请发出以下命令:
sudo multipass set local.driver=virtualbox
使用命令验证Multipass安装:
$ multipass version
multipass 1.10.1+mac
multipassd 1.10.1+mac
步骤2:在Linux和macOS上创建和启动带有Multipass的Ubuntu虚拟机
在系统上成功安装了Multipass后,运行Ubuntu VM非常容易。
要启动Ubuntu实例,请使用以下命令:
multipass launch --name test-instance
或者使用:
multipass launch -n test-instance
在上面的代码中,用所需的Ubuntu实例名称替换测试实例。
最新的最小Ubuntu LTS实例将被下载并自动启动,如下所示:

现在,您可以使用以下命令列出可用的VM:
multipass list
样本输出:
test-instance Running 10.14.155.56 Ubuntu 20.04 LTS
分别代表Name、State、IPv4、Image。
从上面的输出中,我们有一个名为testinstance的Ubuntu实例,带有Ubuntu 20.04 LTS,并且提供了IP。
1、从本地系统为VM执行命令
Multipass的一个惊人特性是,它允许从本地计算机运行Ubuntu实例的命令。
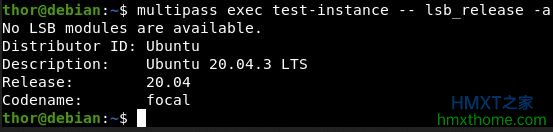
要查找正在运行的VM的系统详细信息,请使用:
multipass exec test-instance -- lsb_release -a
在代码中,测试实例是我们希望获得详细信息的VM的名称。
样本输出:
2、启动Ubuntu VM的shell
除了从本地系统的shell运行命令外,您还可以启动Ubuntu VM的shell并直接在其上运行命令。Ubuntu VM的shell使用以下命令启动:
multipass shell test-instance
样本输出:
Welcome to Ubuntu 20.04.3 LTS (GNU/Linux 5.4.0-81-generic x86_64)
ubuntu@test-instance:~$
在shell中,您可以执行正常的Ubuntu命令,例如:
sudo apt update
要从shell注销,请使用:
exit
3、查找要启动的其他实例
正如我们前面所看到的,Multipass查找并下载用于VM的Ubuntu的当前LTS版本。但您仍然可以使用以下命令找到要运行的其他可用版本:
$ multipass find
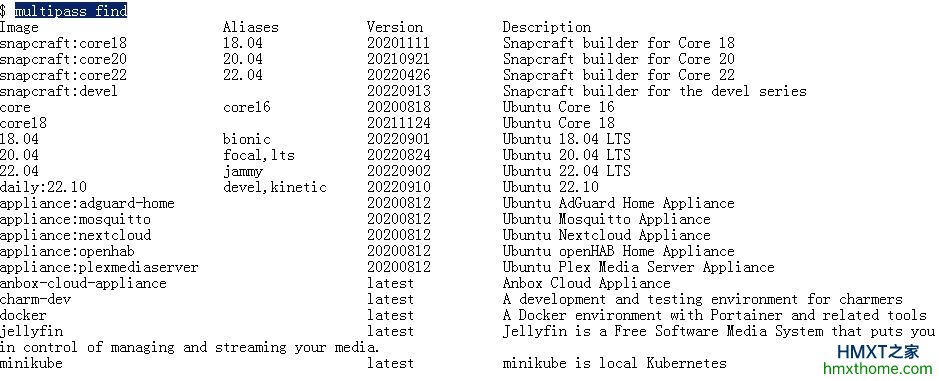
从输出中可以看到几个Ubuntu LTS版本。您可以使用以下语法从列表中启动实例:
$ multipass launch --name test1-instance 22.04
此命令将为Ubuntu 22.04启动一个实例。
4、使用自定义规范创建实例
默认情况下,Multipass将创建一个具有5GB硬盘大小、1CPU和1GB RAM的VM。但是,可以通过为所需的VM进行自定义设置来更改。这有助于创建符合所需规范和需求的VM。
例如,在下面的代码中,我将演示如何创建具有2个CPU、4GB RAM和15GB存储空间的VM:
multipass launch -c 2 -m 4G -d 15G -n test2-instance
查看有关实例的信息:
$ multipass info test2-instance
Name:test2-instance
State:Running
IPv4:10.14.155.175
Release:Ubuntu 20.04.3 LTS
Image hash:97bb9f79af52 (Ubuntu 20.04 LTS)
Load:0.47 0.31 0.12
Disk usage:1.3G out of 14.4G
Memory usage:149.0M out of 3.8G
Mounts:--
请记住,允许的最低要求是:
CPU-1。
内存-128MB。
硬盘-512MB。
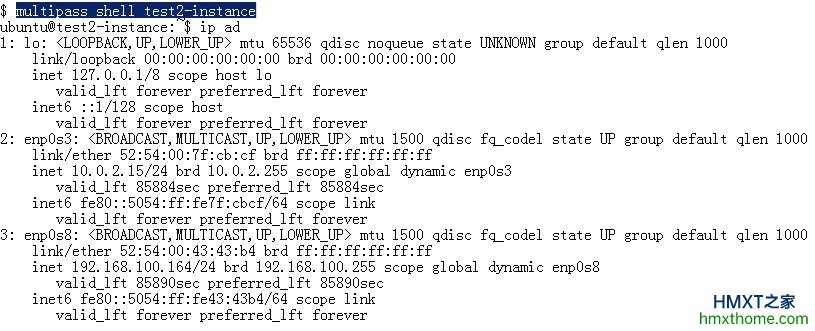
5、使用自定义网络接口启动
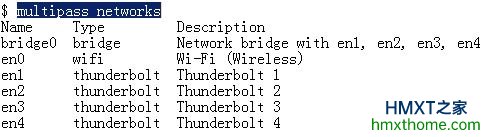
列出可用网络:
$ multipass networks
使用指定的网络接口启动实例:
multipass launch -c 2 -m 4G -d 15G --network name=en0 -n test2-instance
等待实例启动,然后检查可用接口:
$ multipass shell test2-instance
6、挂起正在运行的实例
要挂起Multipass上的实例,请运行以下命令:
multipass suspend test-instance
验证实例是否已挂起:
$ multipass info test-instance
Name:test-instance
State:Suspended
IPv4:--
Release:--
Image hash:97bb9f79af52 (Ubuntu 20.04 LTS)
Load:--
Disk usage:--
Memory usage:--
Mounts:--
命令multipass info test instance通常用于获取有关实例的信息。
步骤3:在Multipass上管理Ubuntu虚拟机
您可以使用以下命令在Multipass上启动和停止Ubuntu VM:
###停止VM
multipass stop test-instance
###启动VM
multipass start test-instance
或者,您可以使用Multipass托盘图标管理VM。这是通过从主机系统上的应用程序菜单启动多路径GUI来完成的。从托盘图标,可以停止/启动、打开shell、禁用和启用VM的自动启动,也可以退出Multipass。
1、删除VM
在完成VM的预期任务后,如果不再需要VM,可以删除它。首先,需要停止VM:
multipass stop test-instance
然后按如下方式删除:
multipass delete test-instance
multipass purge
2、装载和卸载本地目录
要装载本地目录,请使用以下命令语法:
multipass mount <source> <target> [<target> ...]
例子:
$ multipass list
$ multipass mount ~/Downloads ubuntu-focal
$ multipass info ubuntu-focal
$ multipass ssh ubuntu-focal
$ ubuntu@ubuntu-focal:~$ df -hT
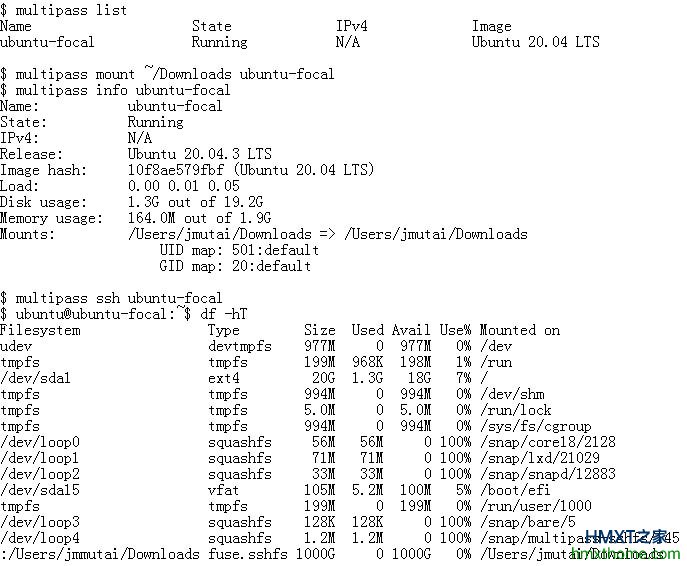
要卸载,请使用以下命令:
$ multipass umount ubuntu-focal
$ multipass info ubuntu-focal
Name:ubuntu-focal
State:Running
IPv4:N/A
Release:Ubuntu 20.04.3 LTS
Image hash:10f8ae579fbf (Ubuntu 20.04 LTS)
Load:0.00 0.00 0.04
Disk usage:1.3G out of 19.2G
Memory usage:159.8M out of 1.9G
Mounts:--
如果您在使用Multipass时遇到问题,可以使用以下命令获得帮助:
$ multipass help
用法:multipass [options] <command>
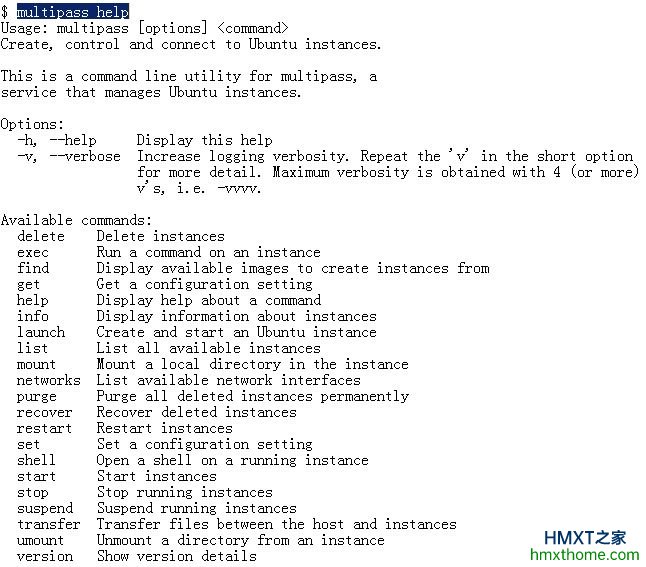
从以上截图中可以看到,Multipass所包含的所有参数及含义。掌握它,有助于在Multipass上管理Ubuntu虚拟机。
相关资讯


