更新时间:2022-01-22 11:20:40浏览次数:627+次
以下为你详细解释fg、fc、fdisk、fdformat命令的用法。
Linux fg命令的用法及解释
Linux fg命令用于将后台作业(在后台运行的或者在后台挂起的作业)放到前台终端运行。与bg命令一样,若后台任务中只有一个,则使用该命令时,可以省略任务号。
在Linux操作系统中执行某些操作时候,有时需要将当前任务暂停调至后台,或有时须将后台暂停的任务重启开启并调至前台,这一序列的操作将会使用到 jobs、bg、和 fg 三个命令以及两个快捷键来完成。
1、语法
fg(参数)
2、参数
作业标识:指定要放到前台的作业标识号。
3、实例
使用fg命令将任务号为1的任务从后台执行转换到前台执行,输入如下命令:
fg 1 #将任务转换到前台执行
执行上面的命令后,命令行窗口将显示如下信息:
find / -name password #前台执行命令
Linux fc命令的用法及解释
Linux fc命令自动掉用vi编辑器修改已有历史命令,当保存时立即执行修改后的命令,也可以用来显示历史命令。fc命令编辑历史命令时,会自动调用vi编辑器。fc保存文件后,会自动执行所编辑过的命令。
1、语法
fc(选项)(参数)
2、选项
-l:显示历史命令;
-n:显示历史命令时,不显示编号;
-r:反序显示历史命令。
3、参数
起始指令编号:指定要编辑的起始指令编号;
结尾指令编号:指定要编辑的结尾指令编号。
4、实例
使用该指令显示最近使用的10条历史命令,输入如下命令:
[root@localhost ~]# fc -l -10 #显示10条历史命令
1039 type -a grep
1040 export
1041 history 10
1042 ulimit -a
1043 shopt
1044 help ls
1045 help env
1046 help short
1047 help shopt
1048 showkey -a
第一列信息是历史命令的编号,第二列信息是历史命令的具体格式。若用户需要编辑第1040条历史命令时,则输入如下命令:
fc 1040 #编辑第1040条历史命令
命令执行成功后,将自动调用vi编辑器编辑指定的命令,编辑完成后保存,会自动执行修改后的命令。当用户在vi编辑器中修改指令并保存后,被修改的命令会被自动调用并执行。
Linux fdisk命令的用法及解释
Linux fdisk命令用于观察硬盘实体使用情况,也可对硬盘分区。它采用传统的问答式界面,而非类似DOS fdisk的cfdisk互动式操作界面,因此在使用上较为不便,但功能却丝毫不打折扣。
1、语法
fdisk(选项)(参数)
2、选项
-b<分区大小>:指定每个分区的大小;
-l:列出指定的外围设备的分区表状况;
-s<分区编号>:将指定的分区大小输出到标准输出上,单位为区块;
-u:搭配"-l"参数列表,会用分区数目取代柱面数目,来表示每个分区的起始地址;
-v:显示版本信息。
3、参数
设备文件:指定要进行分区或者显示分区的硬盘设备文件。
4、实例
首先选择要进行操作的磁盘:
[root@localhost ~]# fdisk /dev/sdb
输入m列出可以执行的命令:
command (m for help): m
Command action
a toggle a bootable flag
b edit bsd disklabel
c toggle the dos compatibility flag
d delete a partition
l list known partition types
m print this menu
n add a new partition
o create a new empty DOS partition table
p print the partition table
q quit without saving changes
s create a new empty Sun disklabel
t change a partition's system id
u change display/entry units
v verify the partition table w write table to disk and exit
x extra functionality (experts only)
输入p列出磁盘目前的分区情况:
Command (m for help): p
Disk /dev/sdb: 3221 MB, 3221225472 bytes
255 heads, 63 sectors/track, 391 cylinders
Units = cylinders of 16065 * 512 = 8225280 bytes
输入d然后选择分区,删除现有分区:
Command (m for help): d
Partition number (1-4): 1
Command (m for help): d
Selected partition 2
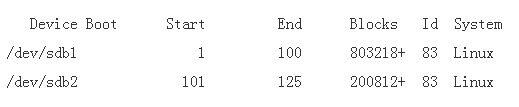
查看分区情况,确认分区已经删除:
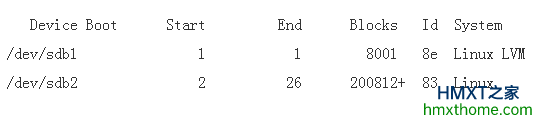
Command (m for help): print
Disk /dev/sdb: 3221 MB, 3221225472 bytes
255 heads, 63 sectors/track, 391 cylinders
Units = cylinders of 16065 * 512 = 8225280 bytes
Device Boot Start End Blocks Id System
Command (m for help):
输入n建立新的磁盘分区,首先建立两个主磁盘分区:
Command (m for help): n
Command action
e extended
p primary partition (1-4)
p //建立主分区
Partition number (1-4): 1 //分区号
First cylinder (1-391, default 1): //分区起始位置
Using default value 1
last cylinder or +size or +sizeM or +sizeK (1-391, default 391): 100 //分区结束位置,单位为扇区
Command (m for help): n //再建立一个分区
Command action
e extended
p primary partition (1-4)
p
Partition number (1-4): 2 //分区号为2
First cylinder (101-391, default 101):
Using default value 101
Last cylinder or +size or +sizeM or +sizeK (101-391, default 391): +200M //分区结束位置,单位为M
确认分区建立成功:
Command (m for help): p
Disk /dev/sdb: 3221 MB, 3221225472 bytes
255 heads, 63 sectors/track, 391 cylinders
Units = cylinders of 16065 * 512 = 8225280 bytes
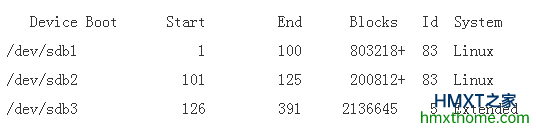
再建立一个逻辑分区:
Command (m for help): n
Command action
e extended
p primary partition (1-4)
e //选择扩展分区
Partition number (1-4): 3
First cylinder (126-391, default 126):
Using default value 126
Last cylinder or +size or +sizeM or +sizeK (126-391, default 391):
Using default value 391
确认扩展分区建立成功:
Command (m for help): p
Disk /dev/sdb: 3221 MB, 3221225472 bytes
255 heads, 63 sectors/track, 391 cylinders
Units = cylinders of 16065 * 512 = 8225280 bytes
在扩展分区上建立两个逻辑分区:
Command (m for help): n
Command action
l logical (5 or over)
p primary partition (1-4)
l //选择逻辑分区
First cylinder (126-391, default 126):
Using default value 126
Last cylinder or +size or +sizeM or +sizeK (126-391, default 391): +400M
Command (m for help): n
Command action
l logical (5 or over)
p primary partition (1-4)
l
First cylinder (176-391, default 176):
Using default value 176
Last cylinder or +size or +sizeM or +sizeK (176-391, default 391):
Using default value 391
确认逻辑分区建立成功:
Command (m for help): p
Disk /dev/sdb: 3221 MB, 3221225472 bytes
255 heads, 63 sectors/track, 391 cylinders
Units = cylinders of 16065 * 512 = 8225280 bytes
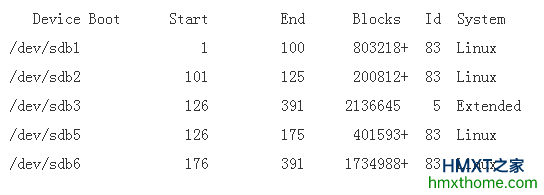
Command (m for help):
从上面的结果我们可以看到,在硬盘sdb我们建立了2个主分区(sdb1,sdb2),1个扩展分区(sdb3),2个逻辑分区(sdb5,sdb6)
注意:主分区和扩展分区的磁盘号位1-4,也就是说最多有4个主分区或者扩展分区,逻辑分区开始的磁盘号为5,因此在这个实验中试没有sdb4的。
最后对分区操作进行保存:
Command (m for help): w
The partition table has been altered!
Calling ioctl() to re-read partition table.
Syncing disks.
建立好分区之后我们还需要对分区进行格式化才能在系统中使用磁盘。
在sdb1上建立ext2分区:
[root@localhost ~]# mkfs.ext2 /dev/sdb1
mke2fs 1.39 (29-May-2017)
Filesystem label=
OS type: Linux
Block size=4096 (log=2)
Fragment size=4096 (log=2)
100576 inodes, 200804 blocks
10040 blocks (5.00%) reserved for the super user
First data block=0
Maximum filesystem blocks=209715200
7 block groups
32768 blocks per group, 32768 fragments per group
14368 inodes per group
Superblock backups stored on blocks:
32768, 98304, 163840
Writing inode tables: done
Writing superblocks and filesystem accounting information: done
This filesystem will be automatically checked every 32 mounts or
180 days, whichever comes first. Use tune2fs -c or -i to override.
在sdb6上建立ext3分区:
[root@localhost ~]# mkfs.ext3 /dev/sdb6
mke2fs 1.39 (29-May-2017)
Filesystem label=
OS type: Linux
Block size=4096 (log=2)
Fragment size=4096 (log=2)
217280 inodes, 433747 blocks
21687 blocks (5.00%) reserved for the super user
First data block=0
Maximum filesystem blocks=444596224
14 block groups
32768 blocks per group, 32768 fragments per group
15520 inodes per group
Superblock backups stored on blocks:
32768, 98304, 163840, 229376, 294912
Writing inode tables: done
Creating journal (8192 blocks): done
Writing superblocks and filesystem accounting information: done
This filesystem will be automatically checked every 32 mounts or
180 days, whichever comes first. Use tune2fs -c or -i to override.
[root@localhost ~]#
建立两个目录/oracle和/web,将新建好的两个分区挂载到系统:
[root@localhost ~]# mkdir /oracle
[root@localhost ~]# mkdir /web
[root@localhost ~]# mount /dev/sdb1 /oracle
[root@localhost ~]# mount /dev/sdb6 /web
查看分区挂载情况:
[root@localhost ~]# df -h

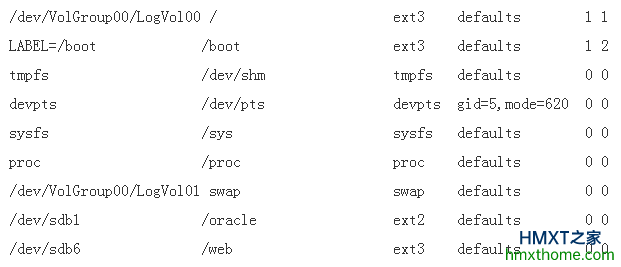
如果需要每次开机自动挂载则需要修改/etc/fstab文件,加入两行配置:
[root@localhost ~]# vim /etc/fstab
Linux fdformat命令的用法及解释
Linux fdformat命令使用权限:所有使用者。
1、用法
fdformat [-n] device
2、使用说明
对指定的软碟机装置进行低阶格式化。使用这个指令对软碟格式化的时候,最好指定像是下面的装置:
/dev/fd0d360 磁碟机 A: ,磁片为 360KB 磁碟
/dev/fd0h1440 磁碟机 A: ,磁片为 1.4MB 磁碟
/dev/fd1h1200 磁碟机 B: ,磁片为 1.2MB 磁碟
如果使用像是 /dev/fd0 之类的装置,如果里面的磁碟不是标准容量,格式化可能会失败。在这种情况之下,使用者可以用 setfdprm 指令先行指定必要参数。
3、参数
-n:关闭确认功能。这个选项会关闭格式化之后的确认步骤。
4、实例
fdformat -n /dev/fd0h1440
将磁碟机 A 的磁片格式化成 1.4MB 的磁片。并且省略确认的步骤。
相关资讯