更新时间:2022-12-19 16:24:09浏览次数:534+次
本文介绍在Linux系统上安装Cryptsetup及将磁盘分区格式化为LUKS、创建加密分区,同时附上创建用于自动身份验证的密钥,以Ubuntu、Debian发行版为例说明。Cryptsetup是一个基于DM Crypt的Linux加密工具,它可用于加密硬盘和外部媒体,加密是使用Linux统一密钥设置(LUKS)完成的,它提供了磁盘加密规范,有助于各种发行版的兼容性。
在Ubuntu/Debian上安装Cryptsetup
Cryptsetup实用工具在默认的Ubuntu/Debian存储库中可用,可以使用下面的APT命令下载:
sudo apt update
sudo apt install cryptsetup
依赖关系树,请按y键继续:
Reading state information... Done
The following package was automatically installed and is no longer required:
linux-image-5.10.0-8-amd64
Use 'sudo apt autoremove' to remove it.
The following additional packages will be installed:
cryptsetup-bin cryptsetup-initramfs cryptsetup-run
Suggested packages:
keyutils
The following NEW packages will be installed:
cryptsetup cryptsetup-bin cryptsetup-initramfs cryptsetup-run
0 upgraded, 4 newly installed, 0 to remove and 0 not upgraded.
Need to get 762 kB of archives.
After this operation, 2,846 kB of additional disk space will be used.
Do you want to continue? [Y/n] y
将磁盘分区格式化为LUKS
首先,确定连接到系统的驱动器:
$ lsblk

对于本文,我们有主磁盘(vda)和另一个磁盘(sda)。我们将使用第二个磁盘(sda),它也可以是外部驱动器/可移动介质。
首先,备份磁盘中的数据并将其格式化为LUKS:
sudo cryptsetup luksFormat /dev/sda
在上面的命令中,我们使用luksFormat在/dev/sda上启动了Cryptsetup加密。按以下步骤操作:
WARNING!
This will overwrite data on /dev/sda irrevocably.
Are you sure? (Type 'yes' in capital letters): YES
Enter passphrase for /dev/sda: <SET-PASSPHRASE>
Verify passphrase: <CONFIRM-PASSPHRASE>
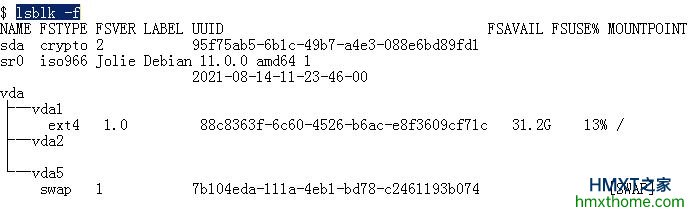
键入YES并提供密码,以加密磁盘。您也可以使用密钥进行加密,但在这里,我们将继续设置密码短语。完成后,磁盘将被格式化,并可按如下方式查看:
$ lsblk -f
创建加密分区
一旦磁盘按上述方式加密,您就无法访问其上的数据。用于能够访问和分区它。打开它并创建如下分区:
sudo cryptsetup luksOpen /dev/sda cryptpart
提供上面设置的密码以打开磁盘:

运行以下命令以识别磁盘:
lsblk -f
输出:
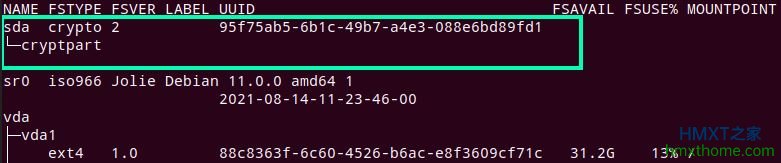
从输出中,我们可以看到在sda下创建的新卷(cryptpart)。这是由Linux的映射器设备创建的。
现在创建一个新分区。在这里,我将创建一个EXT4分区:
$ sudo mkfs.ext4 /dev/mapper/cryptpart
mke2fs 1.46.2
Creating filesystem with 2617344 4k blocks and 655360 inodes
Filesystem UUID: 289493ba-f87b-41c9-803a-c59baf112fff
Superblock backups stored on blocks:
32768, 98304, 163840, 229376, 294912, 819200, 884736, 1605632
Allocating group tables: done
Writing inode tables: done
Creating journal (16384 blocks): done
Writing superblocks and filesystem accounting information: done
现在创建一个装载点并临时装载创建的分区:
sudo mkdir -p /mnt/encrypted
sudo mount /dev/mapper/cryptpart /mnt/encrypted
验证磁盘是否已安装:
$ lsblk | grep cryptpart
cryptpart 253:0 0 10G 0 crypt /mnt/encrypted
附:创建用于自动身份验证的密钥
如果需要创建身份验证密钥,按下面的方法操作。
此密钥可按如下方式创建:
echo "StrongPassw0rd" > volume-key
sudo mv volume-key /boot/
设置所需的权限:
sudo chown root:root /boot/volume-key
sudo chmod 0400 /boot/volume-key
现在使用语法将密钥添加到LUKS Volume:
sudo cryptsetup luksAddKey <encrypted_device> <path_to_key>
例如:
sudo cryptsetup luksAddKey /dev/sda /boot/volume-key
提供要添加到卷中的密钥的密码短语。验证是否已添加密钥:
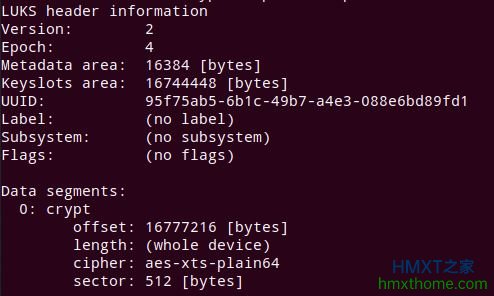
sudo cryptsetup luksDump /dev/sda
样本输出:
现在,通过用密钥替换none来修改cryptab文件以适应新的身份验证方法:
$ sudo vim /etc/crypttab
# Content of the crypttab file
cryptpart UUID=<partition_uuid> /boot/volume-key luks
通过重新启动系统进行验证:
sudo reboot
验证设备是否已安装:
lsblk -f
样本输出:

如上图所示,说明操作成功。
相关资讯


