更新时间:2023-01-24 10:20:13浏览次数:288+次
学习完本文的操作,您应该能够独立在Rocky Linux 9系统上安装和配置Redis服务器。
1、在Rocky Linux 9上安装Redis
Redis 6.2位于默认的Rocky Linux 9存储库中,可以通过运行以下命令进行安装:
sudo dnf install vim redis
依赖关系树:
Install 1 Package
Total download size: 1.3 M
Installed size: 4.7 M
Is this ok [y/N]: y
等待安装完成,然后启动并启用服务:
sudo systemctl start redis
sudo systemctl enable redis
验证服务是否正在运行:
$ systemctl status redis
redis.service - Redis persistent key-value database
Loaded: loaded (/usr/lib/systemd/system/redis.service; enabled; vendor preset: disabled)
检查已安装的版本:
$ redis-server --version
Redis server v=6.2.6 sha=00000000:0 malloc=jemalloc-5.1.0 bits=64 build=9664d239a7dd0d5e
$ redis-cli --version
redis-cli 6.2.6
2、在Rocky Linux 9上配置Redis
Redis将其配置文件存储在/etc/redis/redis.conf中。可以根据需要编辑该文件。
首先,打开文件进行编辑:
sudo vim /etc/redis/redis.conf
在文件中,可以进行几个调整。这些是:
1]、绑定地址
默认情况下,Redis配置为侦听本地主机。这可以更改为您的IP地址,如下所示:
bind 127.0.0.1 -::1 192.168.205.12
2]、监视Redis
这允许Redis作为守护程序运行:
daemonize yes
将服务设置为与systemd交互:
supervised systemd
3]、安全Redis
默认情况下,Redis服务器不安全,任何人都可以访问它并操作数据。要保护它,请如下所示设置密码:
requirepass StrongPassword
完成所需配置后,保存文件并重新启动服务:
sudo systemctl daemon-reload
sudo systemctl restart redis
Redis默认监听6379端口,允许该端口通过防火墙:
sudo firewall-cmd --zone=public --permanent --add-port=6379/tcp
sudo firewall-cmd --reload
3、在Rocky Linux 9上使用Redis
可以使用Redis CLI从本地主机访问和使用Redis,如下所示:
$ redis-cli
然后使用以下命令验证数据库:
127.0.0.1:6379> auth StrongPassword
OK
127.0.0.1:6379> exit
或者,您可以使用单个命令对数据库进行身份验证。例如:
$ redis-cli -a StrongPassword -n 1
Warning: Using a password with '-a' or '-u' option on the command line interface may not be safe.
127.0.0.1:6379[1]> exit
为了避免上述警告,可以使用–no-auth-warning标志:
$ redis-cli -a StrongPassword -n 1 --no-auth-warning
127.0.0.1:6379[1]>
要切换到另一个数据库,请提供数据库ID。例如:
127.0.0.1:6379[1]> select 2
OK
获取有关服务器的信息:
127.0.0.1:6379[2]> info
# Server
redis_version:6.2.6
redis_git_sha1:00000000
redis_git_dirty:0
redis_build_id:9664d239a7dd0d5e
redis_mode:standalone
os:Linux 5.14.0-70.13.1.el9_0.x86_64 x86_64
arch_bits:64
multiplexing_api:epoll
atomicvar_api:atomic-builtin
gcc_version:11.2.1
process_id:31419
process_supervised:systemd
run_id:90b6e7b18bb5137d47f8c5539c46ffa05a30f451
tcp_port:6379
server_time_usec:1659097502902846
uptime_in_seconds:731
uptime_in_days:0
hz:10
要查看连接的客户端,请使用:
127.0.0.1:6379> client list
id=5 addr=127.0.0.1:60324 laddr=127.0.0.1:6379 fd=9 name= age=446 idle=0 flags=N db=2 sub=0 psub=0 multi=-1 qbuf=26 qbuf-free=40928 argv-mem=10 obl=0 oll=0 omem=0 tot-mem=61466 events=r cmd=client user=default redir=-1
要终止与客户端的连接,请使用具有以下语法的命令:
127.0.0.1:6379> client kill 10.0.0.51:53338
OK
要保存数据,请使用以下命令:
127.0.0.1:6379> save
OK
您也可以在后台保存数据:
127.0.0.1:6379> bgsave
Background saving started
要获取上次保存的UNIX时间戳,请执行以下操作:
127.0.0.1:6379> lastsave
(integer) 1659097794
要保存数据并关闭Redis,请使用以下命令:
127.0.0.1:6379> shutdown
not connected> quit
之后,Redis服务器将不会运行,请验证:
ps aux | grep [r]edis
你需要重新启动它才能使用它:
sudo systemctl start redis
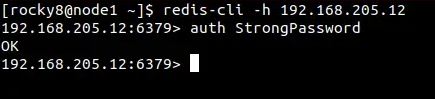
1]、远程连接到Redis
可以使用以下语法的命令远程连接到正在运行的Redis实例:
redis-cli -h IP_Address/Domain_name
例如以下截图:
2]、在Node.js上使用Redis
这是一个如何将Redis与Node.js一起使用的示例。首先安装Redis客户端模块:
sudo dnf install npm -y
npm install redis
现在创建使用Redis数据库的Node.js应用程序:
vim redis_sample.js
在文件中,添加行:
const redis = require('redis');
const client = redis.createClient({
socket: {
host: '127.0.0.1',
port: 6379
},
password: 'StrongPassword'
});
async function addToSortedSet() {
await client.connect();
await client.zAdd('mysortedset', [
{
score: 97,
value: 'Ninety seven'
},
{
score: 98,
value: 'Ninety eight'
},
{
score: 99,
value: 'Ninety Nine'
},
{
score: 100,
value: 'One Hundred'
},
{
score: 101,
value: 'One Hundred and One'
}
]);
// Get all of the values/scores from the sorted set using
// the scan approach:
// https://redis.io/commands/zscan
for await (const memberWithScore of client.zScanIterator('mysortedset')) {
console.log(memberWithScore);
}
await client.quit();
}
addToSortedSet();
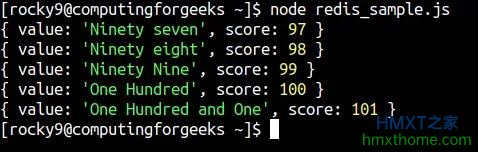
上面的示例演示了如何创建排序列表。请记住相应地替换您的Redis服务器密码。保存文件并运行应用程序:
node redis_sample.js
样本输出:
如果密码错误,您将得到如下输出:
$ node redis_sample.js
node:internal/process/promises:265
triggerUncaughtException(err, true /* fromPromise */);
^
[ErrorReply: WRONGPASS invalid username-password pair or user is disabled.]
为了方便使用,您可以使用GUI工具,不过得另外安装。
总结
通过以上操作,我们已经了解了如何在Rocky Linux 9上安装和配置Redis服务器。我们还学习了Redis CLI上的基本命令,以及如何将Redis与Node.js一起使用。
相关资讯


