更新时间:2023-02-02 11:12:12浏览次数:399+次
通过遵循本指南,您应该能够学会如何使用Arch Linux installer(安装程序)安装Arch Linux操作系统。当前手动Arch Linux非常复杂和乏味,因为它涉及无数步骤,如果是使用Arch安装程序,它可以自动并简化安装过程。
设置要求如下
流畅的互联网连接。
USB/DVD驱动器。
至少1GB的RAM和20GB的可用硬盘空间。
64位系统。
您还需要对机器、ISO文件和命令行实用程序有基本的了解。
具体操作步骤如下
1、为Arch Linux创建可引导磁盘
对于本指南,您需要一个可引导磁盘,以便能够引导到实时模式并运行Arch Linux安装程序。
这可以是任何Linux系统ISO文件,但最推荐的是从Arch Linux下载页面下载的Arch Linux ISO文件,地址在https://archlinux.org/download/。
现在,使用以下命令创建可引导介质:
#识别USB设备
sudo lsblk
#Flash Arch Linux到USB驱动器
sudo dd bs=4M if=Arch_linux.iso of=/dev/sdX status=progress oflag=sync
记住用正确的iso路径替换Arch_linux.iso,用可引导驱动器路径替换/dev/sdX。
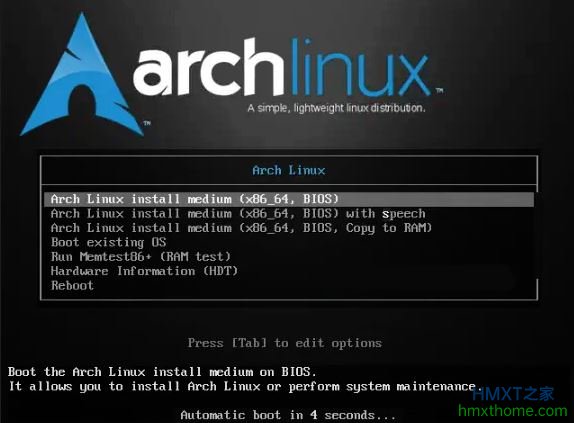
2、引导到实时模式
现在,使用创建的可引导磁盘,将其插入系统并从中引导。例如,引导到Arch Linux live,如下所示:
3、安装Arch Linux installer
默认情况下,Arch Linux installer在使用官方Arch Linux ISO时存在,无需安装。但如果您使用任何其他基于Linux的系统ISO,则需要安装它。Arch Linux的安装程序可以通过多种方式安装。这些方法包括:
1]、使用pacman安装
Arch Linux安装程序存在于默认Arch存储库中,可以按如下方式安装:
pacman -S archinstall
2]、使用PyPi安装
您还可以使用Python PIP安装Arch Linux安装程序:
pip install archinstall
3]、使用源代码安装
您也可以通过从源代码构建这个包来安装它。首先克隆GitHub存储库:
git clone https://github.com/archlinux/archinstall
通常情况下,您有两个安装软件包的选项。使用Setuptools将其安装到模块路径中:
sudo python setup.py install
或将文件夹移动到项目中,只需执行以下操作:
import archinstall
4、使用Arch Linux安装程序安装Arch Linux
Arch Linux安装程序提供了在物理或虚拟机上安装Arch Linux的最简单方法。运行引导安装有两个选项:从配置文件安装或直接安装。
运行安装程序时,可以添加一个配置文件,为所有指导步骤提供预先配置的答案。配置文件采用以下选项:
–config–仅处理语言的常规配置以及要使用的配置文件。
–disk_layouts–用于在–config中定义所选“硬盘驱动器(hard drives)”上所需的分区策略。
–creds–用于任何超级用户、用户或根帐户数据。
配置可以保存在本地或远程路径中,作为.json文件。例如,定义语言和配置文件,可以根据自己的情况进行调整,比如更改timezone选项等:
{
"audio": "pipewire",
"bootloader": "systemd-bootctl",
"custom-commands": [
"cd /home/devel; git clone https://aur.archlinux.org/paru.git",
"chown -R devel:devel /home/devel/paru",
"usermod -aG docker devel"
],
"filesystem": "btrfs",
"gfx_driver": "VMware / VirtualBox (open-source)",
"harddrives": [
"/dev/nvme0n1"
],
"swap": true,
"hostname": "development-box",
"kernels": [
"linux"
],
"keyboard-language": "us",
"mirror-region": "Worldwide",
"nic": {
"NetworkManager": true,
"nic": "Use NetworkManager (necessary to configure internet graphically in GNOME and KDE)"
},
"ntp": true,
"packages": ["docker", "git", "wget", "zsh"],
"profile": "gnome",
"services": ["docker"],
"sys-encoding": "utf-8",
"sys-language": "en_US",
"timezone": "US/Eastern",
}
要使用配置文件,例如example.json,请按以下步骤操作:
archinstall --config example.json
下面是--creds.json文件的示例:
{
"!root-password" : "SecretSanta2023"
}
对于--disk_layouts选项:
{
"/dev/loop0": {
"partitions": [
{
"boot": true,
"encrypted": false,
"filesystem": {
"format": "fat32"
},
"format": true,
"mountpoint": "/boot",
"size": "513MB",
"start": "5MB",
"type": "primary"
},
{
"btrfs": {
"subvolumes": {
"@.snapshots": "/.snapshots",
"@home": "/home",
"@log": "/var/log",
"@pkgs": "/var/cache/pacman/pkg"
}
},
"encrypted": true,
"filesystem": {
"format": "btrfs"
},
"format": true,
"mountpoint": "/",
"size": "100%",
"start": "518MB",
"type": "primary"
}
],
"wipe": true
}
}
接下来运行引导安装。
对于本指南,我们将直接运行安装程序,而无需任何预定义的配置文件。请输出以下命令:
archinstall --script guided
安装程序将首先要求您进行配置。首先设置首选的键盘布局。对于本指南,我将设置美国键盘:
Testing connectivity to the Arch Linux mirrors ...
0: by 20: pl
1: ca 21: ro
2: cf 22: ru
3: cz 23: sg
4: de 24: ua
5: dk 25: uk
6: es 26: us
7: et
8: fa
9: fi
10: fr
11: gr
12: hu
13: il
14: it
15: lt
16: lv
17: mk
18: nl
19: no
-- You can choose a layout that isn't in this list, but whose name you know --
-- Also, you can enter '?' or 'help' to search for more languages, or skip to use us layout --
Select one of the above keyboard languages (by number or full name): 26
接下来设置Arch Linux镜像的位置:
0: Australia
1: Austria
2: Bangladesh
3: Belarus
4: Belgium
5: Bosnia and Herzegovina
6: Brazil
7: Bulgaria
8: Cambodia
9: Canada
10: Chile
11: China
12: Colombia
.....
34: Kenya
35: Latvia
..
-- You can skip this step by leaving the option blank --
Select one of the above regions to download packages from (by number or full name):34
选择要进行安装的磁盘:
0: BlockDevice(/run/archiso/bootmnt/arch/x86_64/airootfs.sfs, size=0.7GB, free_space=, bus_type=None)
1: BlockDevice(None, size=0.8GB, free_space=, bus_type=sata)
2: BlockDevice(/dev/vda, size=40.0GB, free_space=, bus_type=None)
Select one or more harddrives to use and configure (leave blank to skip this step): 2
设置后,所选设备将显示“>>”,您也可以添加另一个。否则,按Enter键继续:
0: BlockDevice(/run/archiso/bootmnt/arch/x86_64/airootfs.sfs, size=0.7GB, free_space=, bus_type=None)
1: BlockDevice(None, size=0.8GB, free_space=, bus_type=sata)
2: >> BlockDevice(/dev/vda, size=40.0GB, free_space=, bus_type=None)
Select one or more harddrives to use and configure (leave blank to skip this step): Press Enter
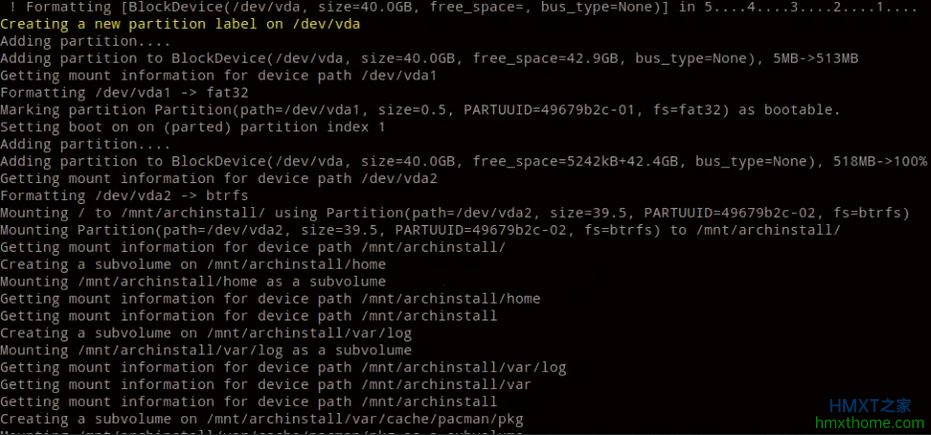
格式化所选分区:
Select one or more harddrives to use and configure (leave blank to skip this step):
0: Wipe all selected drives and use a best-effort default partition layout
1: Select what to do with each individual drive (followed by partition usage)
Select what you wish to do with the selected block devices: 0
选择要使用的文件系统。在这里,我们将继续进行btrfs:
0: btrfs
1: ext4
2: xfs
3: f2fs
Select which filesystem your main partition should use (by number or name): 0
Would you like to use BTRFS subvolumes with a default structure? (Y/n): y
您还可以加密分区。但在这里,我们不会设置加密:
Enter disk encryption password (leave blank for no encryption): Press Enter
继续并创建交换分区:
Would you like to use swap on zram? (Y/n): y
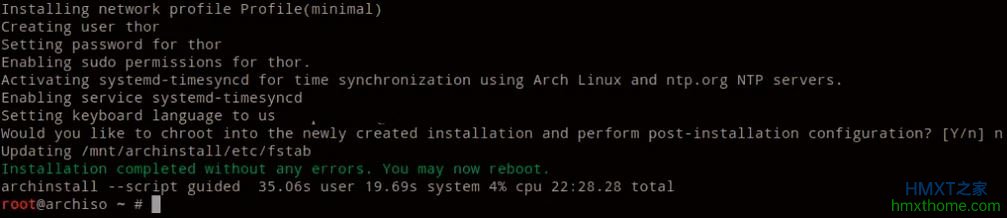
设置首选系统主机名:
Desired hostname for the installation: arch.computingoforgeeks.com
创建超级用户。在这里,您可以通过按Enter键并创建所需的用户和密码来创建所需用户:
Enter root password (leave blank to disable root & create superuser): Press Enter
Create a required super-user with sudo privileges: thor
Password for user thor: *********
And one more time for verification: *********
Enter a username to create an additional user (leave blank to skip & continue): Press Enter
接下来,选择要进行的安装类型。首选的安装是最小的,这是一个非常基本的安装,可以稍后定制:
0: desktop: Provides a selection of desktop environments and tiling window managers, e.g. gnome, kde, sway
1: minimal: A very basic installation that allows you to customize Arch Linux as you see fit.
2: server: Provides a selection of various server packages to install and enable, e.g. httpd, nginx, mariadb
3: xorg: Installs a minimal system as well as xorg and graphics drivers.
-- The above list is a set of pre-programmed profiles. --
-- They might make it easier to install things like desktop environments. --
-- (Leave blank and hit enter to skip this step and continue) --
Enter a pre-programmed profile name if you want to install one: 1
然后选择要安装的音频驱动程序:
0: pipewire
1: pulseaudio
2: none
Choose an audio server or leave blank to use none: 1
设置首选的Linux内核:
0: >> linux
1: linux-hardened
2: linux-lts
3: linux-zen
Choose which kernels to use (leave blank for default: linux): Press Enter
如果需要,还可以安装其他软件包。否则,按Enter键继续:
Only packages such as base, base-devel, linux, linux-firmware, efibootmgr and optional profile packages are installed.
If you desire a web browser, such as firefox or chromium, you may specify it in the following prompt.
Write additional packages to install (space separated, leave blank to skip):
选择要配置的网络接口:
0: Copy ISO network configuration to installation
1: Use NetworkManager (necessary to configure internet graphically in GNOME and KDE)
2: enp1s0
Select one network interface to configure (leave blank to skip): 1
设置时区和NTP:
Enter a valid timezone (examples: Europe/Stockholm, US/Eastern) or press enter to use UTC: Asia/Shanghai
Would you like to use automatic time synchronization (NTP) with the default time servers? [Y/n]: y
然后将允许预览所做的设置,按Enter键继续:
This is your chosen configuration:
{
"audio": "pulseaudio",
"bootloader": "grub-install",
"dry-run": false,
"harddrives": [
"/dev/vda"
],
"hostname": "arch.computingoforgeeks.com",
"kernels": [
"linux"
......
},
"encrypted": false,
"filesystem": {
"format": "btrfs"
},
"format": true,
"mountpoint": "/",
"size": "100%",
"start": "518MB",
"type": "primary"
}
],
"wipe": true
}
}
Press Enter to continue.
安装开始如下:
按以下步骤操作:
Enabling service systemd-timesyncd
Setting keyboard language to us
Would you like to chroot into the newly created installation and perform post-installation configuration? [Y/n] n
您可以进入安装并进行所需的配置。但对于本指南,稍后将进行配置。完成后,您应该看到:
5、后Arch Linux安装配置
现在,弹出安装介质并重新启动系统:
reboot now
当系统重新启动时,使用创建的用户登录,并按如下方式验证安装:
$ cat /etc/os-release
NAME="Arch Linux"
PRETTY_NAME="Arch Linux"
ID=arch
BUILD_ID=rolling
ANSI_COLOR="38;2;23;147;209"
HOME_URL="https://archlinux.org/"
DOCUMENTATION_URL="https://wiki.archlinux.org/"
SUPPORT_URL="https://bbs.archlinux.org/"
BUG_REPORT_URL="https://bugs.archlinux.org/"
LOGO=archlinux-logo
安装所需的应用程序。我将首先安装OpenSSH服务器:
sudo pacman -Sy openssh
安装后,启动并启用服务:
sudo systemctl start sshd
sudo systemctl enable sshd
现在获取系统的IP地址并继续SSH:
$ ip a
6、在Arch Linux上安装桌面环境
如果要在系统上安装桌面环境,则需要安装所需的桌面环境:
##对于KDE
sudo pacman -S plasma kde-applications-meta
sudo systemctl enable sddm.service
##对于Gnome
sudo pacman-key --refresh-keys
sudo pacman -S xorg xorg-server
sudo pacman -S gnome gnome-extra
sudo pacman -S gdm
sudo systemctl enable gdm
##对于XFCE
sudo pacman -S xfce4 xfce4-goodies xfce4-mixer gstreamer0.10-good-plugins \ libxnvctrl xscreensaver # pacman -S lightdm lightdm-gtk-greeter
sudo systemctl enable lightdm.service
##对于Cinnamon
sudo pacman -S cinnamon
sudo pacman –S gdm
sudo systemctl enable gdm
安装后,重新启动系统以应用更改:
sudo reboot
重新启动时,登录系统:

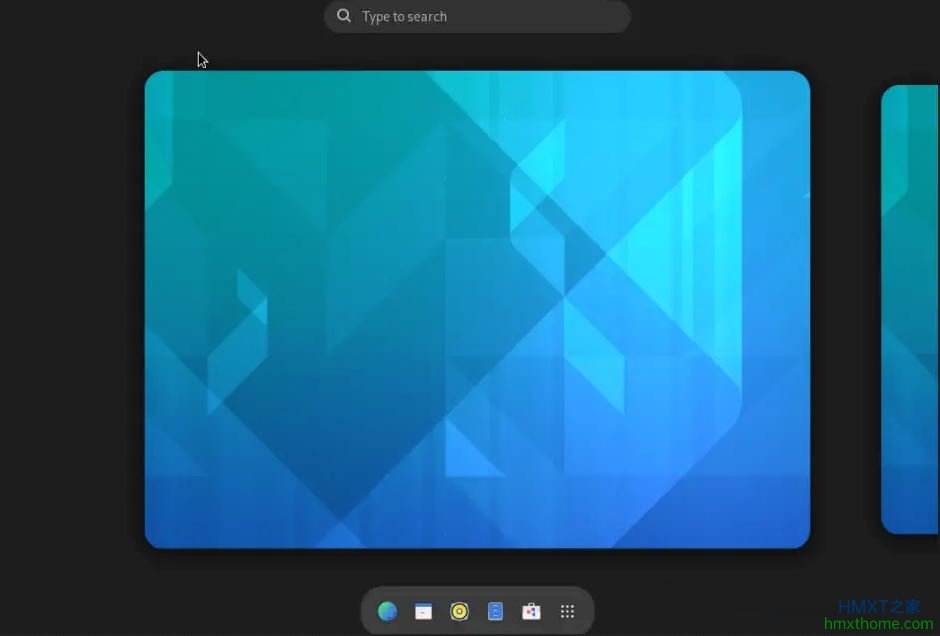
Arch Linux Gnome桌面将显示如下:
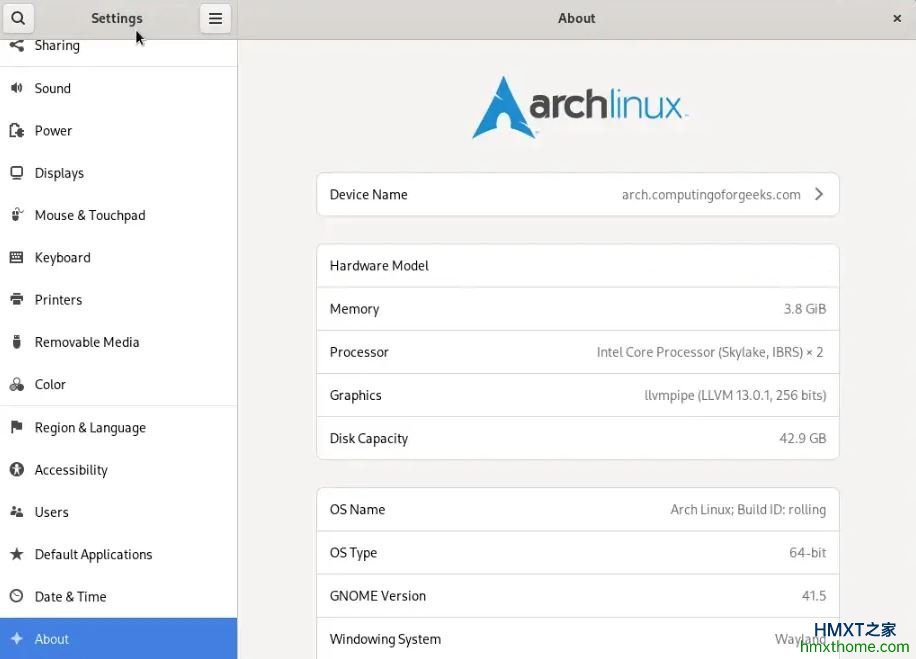
对于Gnome,验证安装如下:
至此,我们已经使用Arch Linux installer(安装程序)成功地安装了Arch Linux操作系统。
相关资讯


