更新时间:2023-02-17 10:50:43浏览次数:500+次
本文介绍在Linux系统上安装OCS Inventory NG服务器的方法,配置完成后就可以正常使用OCS Inventory Server了,将以Rocky Linux 8/AlmaLinux 8发行版为例说明。
具体操作方法
1、更新Rocky Linux 8/AlmaLinux 8系统
在更新的服务器上工作总是很重要的。要实现这一点,请在系统上执行以下命令:
sudo dnf -y update
该过程完成后,您需要重新启动系统,以使需要重新启动才能生效的任何更新:
sudo reboot
2、为OCS Inventory Server安装和配置数据库
数据库是OCS Inventory Server体系结构中的一个重要组件。在本指南中,我们将使用MariaDB作为数据库服务器。使用以下命令将其安装在Rocky Linux 8/AlmaLinux 8上:
sudo dnf install -y @mariadb
完成后,启动并启用服务:
sudo systemctl enable --now mariadb
现在强化MariaDB实例:
$ sudo mysql_secure_installation
按要求配置就可以了。
设置根密码后,使用它访问shell:
mysql -u root -p
现在为OCS Inventory Server创建一个数据库:
CREATE DATABASE ocsweb;
GRANT ALL PRIVILEGES ON ocsweb.* TO ocs@localhost IDENTIFIED BY "StrongPassw0rd";
FLUSH PRIVILEGES;
QUIT;
3、在Rocky Linux 8/AlmaLinux 8上安装Apache和PHP
OCS Inventory NG要求如下:
Apache 2.2或更高版本。
Mod_perl 1.29或更高版本。
PHP 7或更高版本,支持ZIP和GD,包括php_curl、php_soap、php_mbstring、php_xml。
首先将EPEL和REMI存储库添加到系统中:
sudo dnf install dnf-utils epel-release -y
sudo dnf install https://rpms.remirepo.net/enterprise/remi-release-8.rpm -y
添加后,启用REMI和PowerTools存储库:
sudo yum-config-manager --enable remi
sudo dnf config-manager --set-enabled powertools
设置PHP module:
sudo dnf module reset php -y
sudo dnf -y module install php:remi-8.0
现在安装Apache、PHP和所需的所有扩展:
sudo dnf -y install php-{curl,zip,gd,soap,xml,mbstring} @httpd mod_perl
安装完成后,检查PHP版本:
$ php -v
PHP 8.0.26 (cli)
启动并启用Apache和PHP-FPM服务:
sudo systemctl enable --now php-fpm httpd
检查服务状态:
$ systemctl status php-fpm httpd
允许HTTP和HTTPS通过防火墙:
sudo firewall-cmd --zone=public --add-service=http --permanent
sudo firewall-cmd --zone=public --add-service=https --permanent
sudo firewall-cmd --reload
4、安装和配置OCS Inventory服务器
为了能够在Rocky Linux 8/AlmaLinux 8上安装OCS Inventory服务器,我们需要将RPM存储库添加到系统中。这可以使用以下命令完成:
sudo dnf -y install https://rpm.ocsinventory-ng.org/ocsinventory-release-latest.el8.ocs.noarch.rpm
添加的存储库提供:
ocsinventory-server:包含服务器。
ocsinventory:OCS inventory-server和OCS inventory-reports的元包。
ocsinventory-reports:包含OCS reports、管理GUI。
ocsinventory-agent:OCS inventory-agent-core和完全依赖关系的元包。
ocsinventory-agent-core:包含具有最小依赖性的代理。
对于本指南,我们将安装ocsinventory包:
sudo yum install ocsinventory
安装后,导入数据库架构:
mysql -f -hlocalhost -uroot -p ocsweb < /usr/share/ocsinventory-reports/ocsreports/files/ocsbase.sql >log.log
提供根密码以继续。导入后,对PHP进行调整:
sudo vim /etc/php.ini
在文件中,编辑以下行:
upload_max_filesize = 10M
post_max_size = 10M
max_execution_time = 300
max_input_time = 300
memory_limit = 256M
要应用所做的更改,请重新启动Apache和PHP-FPM服务:
sudo systemctl restart httpd php-fpm
5、访问OCS Inventory Web界面
现在,您已设置为访问OCS Inventory Web界面。要访问界面,请使用URL,地址格式为http://IP_address/ocsreports/install.php:
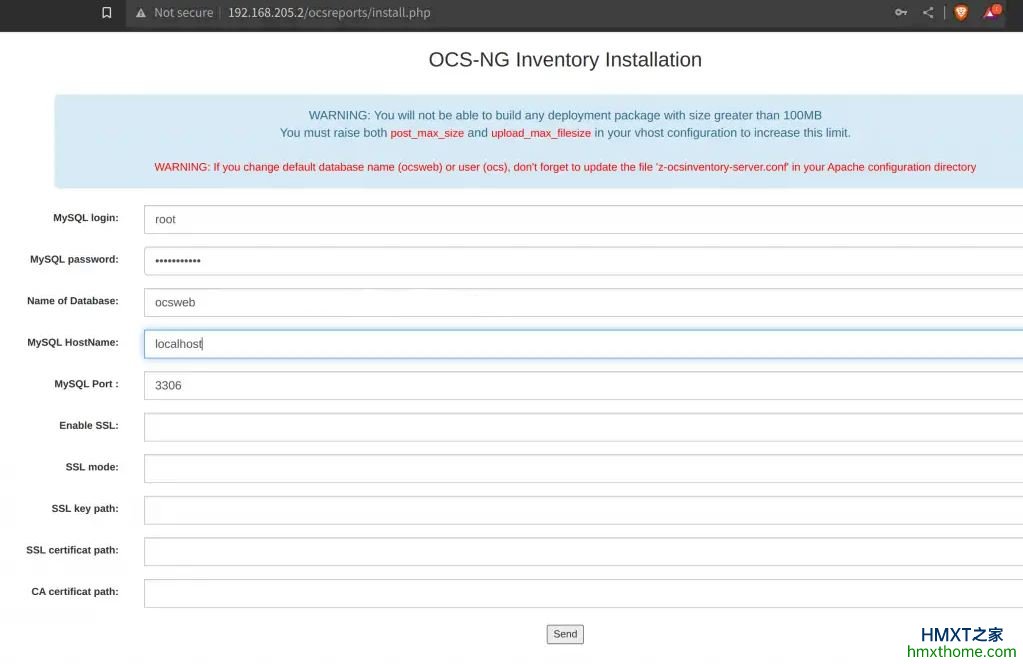
在上面的页面上,提供可以创建表、数据库和索引的用户的凭据。对于他的情况,我们将使用根用户。因此,我们将提供MySQL用户名(root)、MySQL根用户密码、MySQL主机名、MySQL数据库(ocsweb)。
然后按页面的要求进行配置下去就可以了。这里要注意,以下是帐号信息:
用户名:admin
密码:admin
登录后,您将看到以下界面:
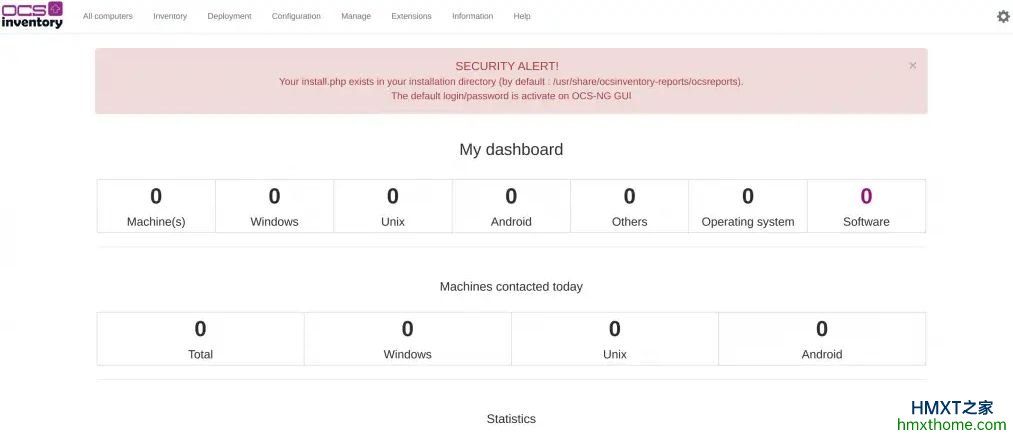
使用以下命令删除错误:
sudo mv /usr/share/ocsinventory-reports/ocsreports/install.php /usr/share/ocsinventory-reports/ocsreports/install.php.original
此外,更新以下文件:
sudo vim /etc/httpd/conf.d/ocsinventory-server.conf
为创建的ocs用户设置用户名和密码:
#主数据库设置
#将localhost替换为MySQL服务器的主机名或ip以进行WRITE
PerlSetEnv OCS_DB_HOST localhost
#将3306替换为运行MySQL服务器的端口,通常为3306
PerlSetEnv OCS_DB_PORT 3306
#数据库名称
PerlSetEnv OCS_DB_NAME ocsweb
PerlSetEnv OCS_DB_LOCAL ocsweb
#允许用户连接到数据库
PerlSetEnv OCS_DB_USER ocs
#用户的密码
PerlSetVar OCS_DB_PWD StrongPassw0rd
要使更改生效,请重新启动Apache和PHP-FPM:
sudo systemctl restart httpd php-fpm
6、设置OCS Inventory代理
为了能够管理客户机,我们将安装并配置ocsinventory-agent包。现在,在所需的客户机上,按如下所示安装软件包:
1]、在Debian/Ubuntu上
导出代码名:
distribution_codename=your-code-name
正确替换代码名称并继续。例如:
distribution_codename=bullseye
#Or
distribution_codename=focal
添加存储库:
##On Debian
curl -sS http://deb.ocsinventory-ng.org/pubkey.gpg | sudo apt-key add -
echo "deb http://deb.ocsinventory-ng.org/debian/ $distribution_codename main" | sudo tee /etc/apt/sources.list.d/ocsinventory.list
##On Ubuntu
curl -sS http://deb.ocsinventory-ng.org/pubkey.gpg | sudo apt-key add -
curl -fsSL http://deb.ocsinventory-ng.org/pubkey.gpg | sudo gpg --dearmor -o /etc/apt/trusted.gpg.d/ocs-archive-keyring.gpg
echo "deb http://deb.ocsinventory-ng.org/ubuntu/ $distribution_codename main" | sudo tee /etc/apt/sources.list.d/ocsinventory.list
安装软件包:
sudo apt update && sudo apt install ocsinventory-agent libsnmp-perl
继续进行如下配置:
Do you want to configure the agent
Please enter 'y' or 'n'?> [y] y
Where do you want to write the configuration file?
0 -> /etc/ocsinventory
1 -> /usr/local/etc/ocsinventory
2 -> /etc/ocsinventory-agent
?> 0
Do you want to create the directory /etc/ocsinventory?
Please enter 'y' or 'n'?> [y] y
Should the old unix_agent settings be imported ?
Please enter 'y' or 'n'?> [y] n
[info] The config file will be written in /etc/ocsinventory/ocsinventory-agent.cfg,
What is the address of your ocs server?> http://192.168.205.2/ocsinventory
Do you need credential for the server? (You probably don't)
Please enter 'y' or 'n'?> [n] n
Do you want to apply an administrative tag on this machine
Please enter 'y' or 'n'?> [y] y
tag?> debian11
Please enter 'y' or 'n'?> [y] y
Where do you want the agent to store its files? (You probably don't need to change i
t)?> [/var/lib/ocsinventory-agent]
Please enter 'y' or 'n'?> [y]
Should I remove the old unix_agent
Please enter 'y' or 'n'?> [n] n
Do you want to activate debug configuration option ?
Please enter 'y' or 'n'?> [y] y
Do you want to use OCS Inventory NG UNix Unified agent log file ?
Please enter 'y' or 'n'?> [y] y
Specify log file path you want to use?> /var/log/ocsinventory-agent/ocsinventory-agent.log
Do you want disable SSL CA verification configuration option (not recommended) ?
Please enter 'y' or 'n'?> [n] n
Do you want to set CA certificates file path ?
Please enter 'y' or 'n'?> [y] n
Do you want to use OCS-Inventory software deployment feature?
Please enter 'y' or 'n'?> [y] y
现在创建日志目录:
sudo mkdir -p /var/log/ocsinventory-agent
sudo touch /var/log/ocsinventory-agent/ocsinventory-agent.log
sudo chmod 775 /var/log/ocsinventory-agent/ocsinventory-agent.log
2]、在RHEL/Rocky Linux/Alma Linux/CentOS上
使用以下命令添加存储库:
##On RHEL 7/Rocky Linux 7/Alma Linux 7/CentOS 7
sudo wget https://dl.fedoraproject.org/pub/epel/epel-release-latest-7.noarch.rpm
sudo wget https://rpm.ocsinventory-ng.org/ocsinventory-release-latest.el7.ocs.noarch.rpm
sudo yum install ocsinventory-release-latest.el7.ocs.noarch.rpm epel-release-latest-7.noarch.rpm
##On RHEL 8/Rocky Linux 8/Alma Linux 8/CentOS 8
sudo dnf -y install https://rpm.ocsinventory-ng.org/ocsinventory-release-latest.el8.ocs.noarch.rpm epel-release
##On RHEL 9/Rocky Linux 9/Alma Linux 9/CentOS 9
sudo dnf -y install https://rpm.ocsinventory-ng.org/ocsinventory-release-latest.el9.ocs.noarch.rpm epel-release yum-utils
sudo yum-config-manager --enable crb
添加存储库后,安装软件包:
sudo yum install ocsinventory-agent net-snmp-perl perl-Net-SNMP
安装后,启动并启用所需的服务:
sudo /sbin/mpathconf --enable
操作完以上后,下面来配置OCS Inventory Agent。
OCS Inventory Agent将其配置文件存储在/etc/ocsinventory/ocsinventory-agent.cfg中。可以根据需要修改此配置文件以与服务器通信:
sudo vim /etc/ocsinventory/ocsinventory-agent.cfg
在文件中,添加以下行:
#服务器URL,如果需要,请取消注释
server = http://your.ocs.ip/ocsinventory
tag = your_tag
##更改下面的行##
basevardir = /var/lib/ocsinventory-agent
默认情况下,Cron Job将每小时向OCS服务器发送数据。我们可以将其配置为每天发送一次数据,方法是将其移动到“cron.daily”,如下所示:
##On Debian/Ubuntu
sudo mv /etc/cron.d/ocsinventory-agent /etc/cron.daily/
##On RHEL/Rocky Linux/Alma Linux/CentOS
sudo mv /etc/cron.hourly/ocsinventory-agent /etc/cron.daily/
现在,通过执行以下命令强制立即发送数据:
sudo ocsinventory-agent
如果出现错误,请查看日志:
$ sudo cat /var/log/ocsinventory-agent/ocsinventory-agent.log
[info] PROLOG_FREQ has changed since last process(old=,new=24)
[info] [download] Download is off.
[info] [download] Beginning work. I am 41047.
[info] [download] Option turned off. Exiting.
[info] [download] Download is off.
[info] [download] Beginning work. I am 41325.
[info] [download] Option turned off. Exiting.
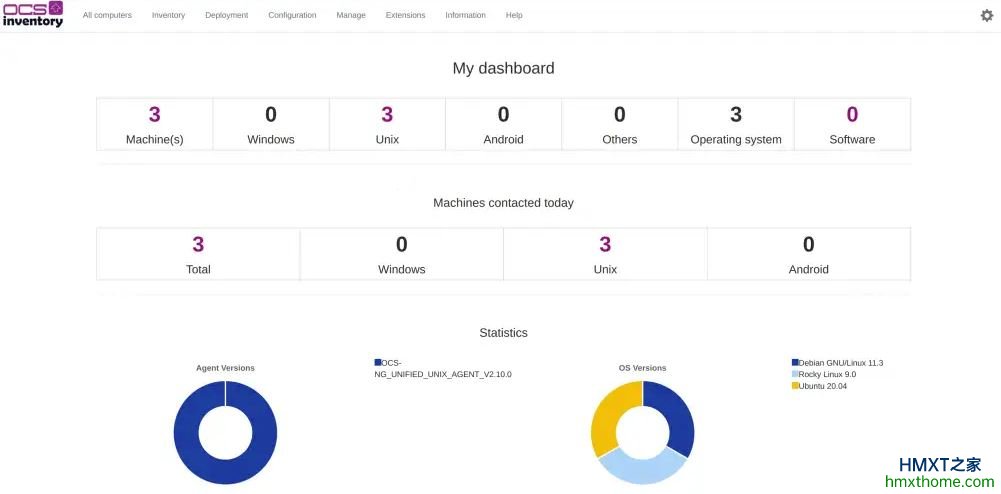
现在,回到OCS库存服务器web界面,您应该看到添加的代理:
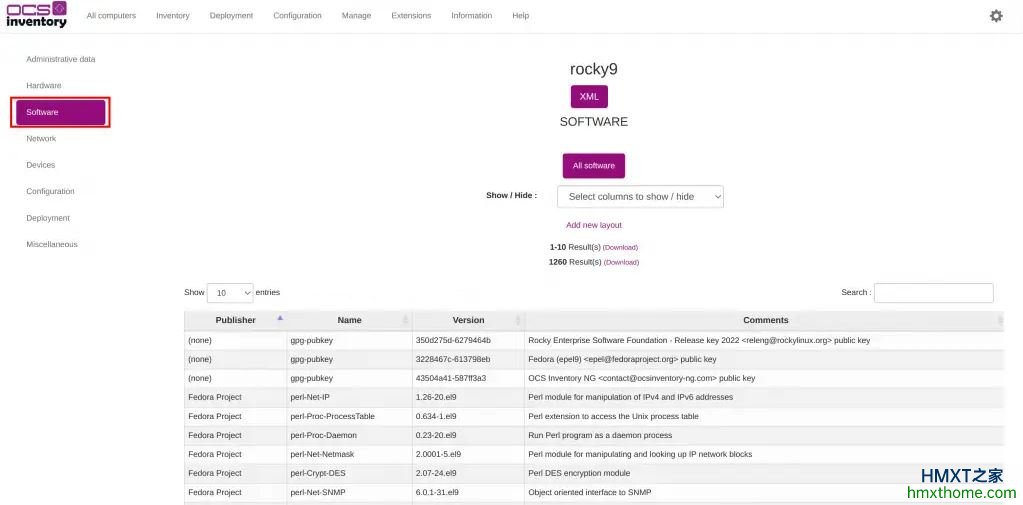
在里面可以查看有关设备的信息,可以看到管理数据,包括查看硬件、软件信息,还可以查看所需的网络、配置、部署和其他信息:
至此,在Linux系统上安装和配置OCS Inventory服务器全部完成,用户可随时添加客户端设备并从OCS Inventory Server web界面管理它。
相关资讯


