更新时间:2023-02-24 15:54:54浏览次数:799+次
本文介绍如何在Ubuntu 20.04上安装、配置和使用Microsoft SQL Server 2022,这可以在Ubuntu 20.04操作系统的服务器或桌面版本上完成。
详细操作步骤
步骤1:更新Ubuntu系统
运行以下命令更新Ubuntu系统上的包索引:
sudo apt update
我们还建议对所有已安装的应用程序进行升级:
sudo apt upgrade -y
如果升级后需要重新启动系统,请执行该操作:
[ -f /var/run/reboot-required ] && sudo reboot -f
步骤2:添加Microsoft APT存储库
系统更新后,安装基本存储库配置包:
sudo apt install wget curl libssl-dev gpg gnupg2 software-properties-common apt-transport-https lsb-release ca-certificates
然后导入公共存储库GPG密钥:
curl https://packages.microsoft.com/keys/microsoft.asc | gpg --dearmor > microsoft.gpg
sudo install -o root -g root -m 644 microsoft.gpg /etc/apt/trusted.gpg.d/
接下来,我们注册Microsoft SQL Server Ubuntu存储库:
wget https://packages.microsoft.com/config/ubuntu/20.04/mssql-server-2022.list
sudo mv mssql-server-2022.list /etc/apt/sources.list.d/microsoft-prod.list
步骤3:安装Microsoft SQL Server
使用以下命令在Ubuntu上安装Microsoft SQL Server 2022:
sudo apt update
sudo apt install mssql-server
按照提示继续安装:
Reading package lists... Done
Building dependency tree... Done
Reading state information... Done
The following additional packages will be installed:
gdb libatomic1 libbabeltrace1 libboost-regex1.74.0 libc++1 libc++1-14 libc++abi1-14 libc6-dbg libdebuginfod-common libdebuginfod1 libipt2 libsasl2-modules-gssapi-mit libsource-highlight-common
libsource-highlight4v5 libsss-nss-idmap0 libunwind-14
Suggested packages:
gdb-doc gdbserver clang
The following NEW packages will be installed:
gdb libatomic1 libbabeltrace1 libboost-regex1.74.0 libc++1 libc++1-14 libc++abi1-14 libc6-dbg libdebuginfod-common libdebuginfod1 libipt2 libsasl2-modules-gssapi-mit libsource-highlight-common
libsource-highlight4v5 libsss-nss-idmap0 libunwind-14 mssql-server
0 upgraded, 17 newly installed, 0 to remove and 4 not upgraded.
Need to get 288 MB of archives.
After this operation, 1,324 MB of additional disk space will be used.
Do you want to continue? [Y/n] y
以下是成功安装所需的输出:
Creating config file /etc/profile.d/debuginfod.sh with new version
Creating config file /etc/profile.d/debuginfod.csh with new version
Setting up libdebuginfod1:amd64 (0.186-1build1) ...
Setting up libsource-highlight-common (3.1.9-4.1build2) ...
Setting up libc6-dbg:amd64 (2.35-0ubuntu3.1) ...
Setting up libunwind-14:amd64 (1:14.0.0-1ubuntu1) ...
Setting up libc++abi1-14:amd64 (1:14.0.0-1ubuntu1) ...
Setting up libboost-regex1.74.0:amd64 (1.74.0-14ubuntu3) ...
Setting up libatomic1:amd64 (12.1.0-2ubuntu1~20.04) ...
Setting up libipt2 (2.0.5-1) ...
Setting up libbabeltrace1:amd64 (1.5.8-2build1) ...
Setting up libsss-nss-idmap0 (2.6.3-1ubuntu3.2) ...
Setting up libsasl2-modules-gssapi-mit:amd64 (2.1.27+dfsg2-3ubuntu1.1) ...
Setting up libsource-highlight4v5 (3.1.9-4.1build2) ...
Setting up libc++1-14:amd64 (1:14.0.0-1ubuntu1) ...
Setting up gdb (12.1-0ubuntu1~20.04) ...
Setting up libc++1:amd64 (1:14.0-55~exp2) ...
Setting up mssql-server (16.0.4003.1-1) ...
Please run 'sudo /opt/mssql/bin/mssql-conf setup'
to complete the setup of Microsoft SQL Server
步骤4:配置SQL Server系统
在使用SQL server之前,我们需要初始化它。这将设置管理员用户密码并生成必要的配置:
sudo /opt/mssql/bin/mssql-conf setup
选择SQL Server版本:
1) Evaluation (free, no production use rights, 180-day limit)
2) Developer (free, no production use rights)
3) Express (free)
4) Web (PAID)
5) Standard (PAID)
6) Enterprise (PAID) - CPU core utilization restricted to 20 physical/40 hyperthreaded
7) Enterprise Core (PAID) - CPU core utilization up to Operating System Maximum
8) I bought a license through a retail sales channel and have a product key to enter.
9) Standard (Billed through Azure) - Use pay-as-you-go billing through Azure.
10) Enterprise Core (Billed through Azure) - Use pay-as-you-go billing through Azure.
Details about editions can be found at
https://go.microsoft.com/fwlink/?LinkId=2109348&clcid=0x409
Use of PAID editions of this software requires separate licensing through a
Microsoft Volume Licensing program.
By choosing a PAID edition, you are verifying that you have the appropriate
number of licenses in place to install and run this software.
By choosing an edition billed Pay-As-You-Go through Azure, you are verifying
that the server and SQL Server will be connected to Azure by installing the
management agent and Azure extension for SQL Server.
Enter your edition(1-10): 2
接受许可条款:
The license terms for this product can be found in
/usr/share/doc/mssql-server or downloaded from:
https://go.microsoft.com/fwlink/?LinkId=2104294&clcid=0x409
The privacy statement can be viewed at:
https://go.microsoft.com/fwlink/?LinkId=853010&clcid=0x409
Do you accept the license terms? [Yes/No]:Yes
SQL Server的配置应在几秒钟内完成并准备就绪:
Enter the SQL Server system administrator password:
Confirm the SQL Server system administrator password:
Configuring SQL Server...
ForceFlush is enabled for this instance.
ForceFlush feature is enabled for log durability.
Created symlink /etc/systemd/system/multi-user.target.wants/mssql-server.service → /lib/systemd/system/mssql-server.service.
Setup has completed successfully. SQL Server is now starting.
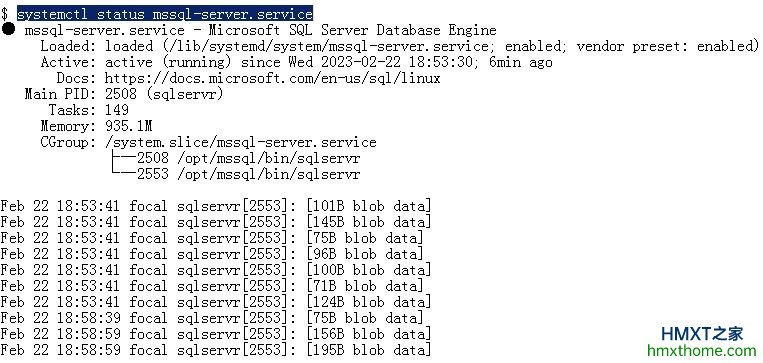
MS SQL服务将自动为您启动。要检查其状态,请运行以下命令:
$ systemctl status mssql-server.service
步骤5:安装SQL Server命令行工具
在连接到DB服务器并在SQL Server上运行Transact-SQL语句之前,需要安装SQL Server命令行工具。以下步骤安装SQL Server命令行工具:sqlcmd(https://learn.microsoft.com/en-us/sql/tools/sqlcmd-utility?view=sql-server-ver16)和bcp(https://learn.microsoft.com/en-us/sql/tools/bcp-utility?view=sql-server-ver16)。
首先导入公共存储库GPG密钥:
curl https://packages.microsoft.com/keys/microsoft.asc | sudo tee /etc/apt/trusted.gpg.d/microsoft.asc
接下来,我们将存储库添加到系统中:
curl https://packages.microsoft.com/config/ubuntu/20.04/prod.list | sudo tee /etc/apt/sources.list.d/msprod.list
安装MS SQL server命令行工具:
sudo apt update
sudo apt install mssql-tools unixodbc-dev
还将/opt/mssql-tools/bin/添加到PATH环境变量中,以便于访问命令行工具:
echo 'export PATH="$PATH:/opt/mssql-tools/bin"' >> ~/.bashrc
source ~/.bashrc
步骤6:连接到MS SQL Server数据库服务器
要从命令行连接到数据库服务器,请使用sqlcmd命令。要使用的参数包括:
-S:指定SQL Server名称。
-U:设置用户名。
-P:提供用户密码。
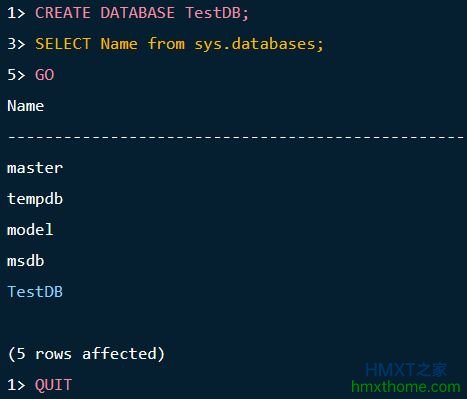
在我们的示例中,我们正在本地连接,因此服务器名称为localhost。用户名是sa,密码是您在安装过程中为sa帐户提供的密码:
sqlcmd -S localhost -U sa -P '<YourPassword>'
如果您在命令行中省略了密码,系统将提示您输入密码。如果连接成功,您将看到sqlcmd命令提示符:1>,如下图所示:
对于远程连接,请为-s参数指定数据库服务器的IP地址,并确保防火墙上的1433端口处于打开状态。
总结
经过实践,按照以上步骤就能在Ubuntu 20.04系统上成功安装和配置MS SQL server 2022。对于其他的Ubuntu版本,比如Ubuntu 22.04,要注意存储库地址,本文是以Ubuntu 20.04为例说明的。
相关资讯


