更新时间:2023-05-03 10:14:55浏览次数:889+次
本文介绍在Ubuntu/Debian/RHEL/CentOS Linux系统上安装和配置Maltrail的方法。Maltrail是一种开源的网络安全工具,有助于检测和阻止恶意流量,在单进程模式下运行至少1GB的RAM,如果在多进程模式下,则至少1GB以上。当前Maltrail可以部署在各种网络环境中,如小型企业、企业和数据中心,它可用于监控入站和出站流量,并可配置为在检测到可疑活动时发送警报。如果所用的Linux系统需要安装Python和pcapy-ng,请参考在Linux系统中安装pcapy-ng软件包一文,阅读地址在https://www.hmxthome.com/linux/5148.html。
安装和配置Maltrail
下面介绍安装Maltrail的方法。首先克隆GitHub repo,如下所示:
cd /opt && sudo git clone --depth 1 https://github.com/stamparm/maltrail.git
处理权限并导航到目录:
sudo chmod -R 775 /opt/maltrail
cd /opt/maltrail
一旦进入目录,就会有一个名为maltrail.conf的配置文件。它包含服务器和传感器的配置。打开此文件以使用以下命令进行编辑:
vim maltrail.conf
这个文件有两个主要块。服务器块和传感器块。服务器块具有以下默认配置:
# [Server]
# Listen address of (reporting) HTTP server
HTTP_ADDRESS 0.0.0.0
# Listen port of (reporting) HTTP server
HTTP_PORT 8338
# Use SSL/TLS
USE_SSL false
# User entries (username:sha256(password):UID:filter_netmask(s))
# Note(s): sha256(password) can be generated on Linux with: echo -n 'password' | sha256sum | cut -d " " -f 1
# UID >= 1000 have only rights to display results (Note: this moment only functionality implemented at the client side)
# filter_netmask(s) is/are used to filter results
USERS
admin:9ab3cd9d67bf49d01f6a2e33d0bd9bc804ddbe6ce1ff5d219c42624851db5dbc:0: # changeme!
# local:9ab3cd9d67bf49d01f6a2e33d0bd9bc804ddbe6ce1ff5d219c42624851db5dbc:1000:192.168.0.0/16 # changeme!
# Mask custom trail names for non-admin users (UID >= 1000)
ENABLE_MASK_CUSTOM true
# Should server do the trail updates too (to support UPDATE_SERVER directive in [Sensor] parameters)
USE_SERVER_UPDATE_TRAILS false
在上面的块中,有如下选项:
HTTP_ADDRESS包含web服务器的侦听地址。0.0.0.0允许它监听所有地址。
HTTP_PORT包含web服务器的侦听端口。默认端口为8338。
USE_SSL设置为true,则SSL/TLS将用于访问web服务器。
USERS包含用户的配置设置。每个用户条目由用户名sha256(password):UID:filter_netmask(s)组成。
FAIL2BAN_REGEX包含正则表达式。
传感器块具有:
# [Sensor]
# Number of processes
PROCESS_COUNT 1
# Disable setting of CPU affinity (with schedtool) on Linux machines (e.g. because of load issues with other processes)
DISABLE_CPU_AFFINITY false
# Use feeds (too) in trail updates
USE_FEED_UPDATES true
# Disable (retrieval from) specified feeds (Note: respective .py files inside /trails/feeds; turris and ciarmy/cinsscore seem to be too "noisy" lately; policeman is old and produces lots of false positives)
DISABLED_FEEDS turris, ciarmy, policeman, myip, alienvault
# Ignore IPs that appear on lower than IP_MINIMUM_FEEDS number of feeds (Note: static IP trails are always included)
IP_MINIMUM_FEEDS 3
# Disable trails based on the following regular expression run against the corresponding info
#DISABLED_TRAILS_INFO_REGEX known attacker|tor exit node
# Update trails after every given period (seconds)
UPDATE_PERIOD 86400
# Location of directory with custom trails (*.txt) files
CUSTOM_TRAILS_DIR ./trails/custom
# (Max.) size of multiprocessing network capture ring buffer (in bytes or percentage of total physical memory) used by sensor (e.g. 512MB)
CAPTURE_BUFFER 10%
# Interface used for monitoring (e.g. eth0, eth1)
MONITOR_INTERFACE any
# Network capture filter (e.g. ip)
# Note(s): more info about filters can be found at: https://danielmiessler.com/study/tcpdump/
#CAPTURE_FILTER ip or ip6
CAPTURE_FILTER udp or icmp or (tcp and (tcp[tcpflags] == tcp-syn or port 80 or port 1080 or port 3128 or port 8000 or port 8080 or port 8118))
# Sensor name to appear in produced logs
SENSOR_NAME $HOSTNAME
此块包含以下选项:
USE_MULTIPROCESSING设置为true,则将使用所有CPU内核。
SENSOR_NAME包含应出现在事件中的名称。
MONITOR_INTERFACE应包含捕获接口的名称。
USE_FEED_UPDATES可以用来完全关闭提要中的跟踪更新(只使用提供的静态更新)。
USE_HEURISTICS开启启发式机制。
用户可以使用CUSTOM_TRAILS_DIR来提供包含自定义踪迹(*.txt)文件的目录的位置。
CAPTURE_FILTER应包含网络捕获(tcpdump)过滤器,以跳过不感兴趣的数据包并简化捕获过程。
UPDATE_PERIOD包含每次自动轨迹更新之间的秒数。
SYSLOG_SERVER/LOGSTASH_SERVER可用于发送传感器事件。
如果要启动并测试传感器和服务器,请使用以下命令:
sudo python3 sensor.py
sudo python3 server.py
要停止它们,请执行:
sudo pkill -f sensor.py
sudo pkill -f server.py
为Maltrail创建系统化服务
我们需要创建一个系统服务,以便在系统启动时自动启动这些服务。首先,通过复制可用的配置为传感器创建一个服务文件:
sudo cp maltrail-sensor.service /etc/systemd/system/
sudo cp maltrail-server.service /etc/systemd/system/
重新加载系统守护程序:
sudo systemctl daemon-reload
启动并启用服务:
sudo systemctl enable --now maltrail-sensor
sudo systemctl enable --now maltrail-server
检查传感器服务的状态:
$ systemctl status maltrail-sensor
maltrail-sensor.service - Maltrail. Sensor of malicious traffic detection system
Loaded: loaded (/etc/systemd/system/maltrail-sensor.service; enabled; vendor preset: disabled)
Active: active (running)
检查服务器服务的状态:
$ systemctl status maltrail-server
maltrail-server.service - Maltrail. Server of malicious traffic detection system
Loaded: loaded (/etc/systemd/system/maltrail-server.service; enabled; vendor preset: disabled)
Active: active (running)
允许服务通过防火墙:
##对于UFW
sudo ufw allow 8338
##用于Firewalld
sudo firewall-cmd --add-port=8338/tcp --permanent
sudo firewall-cmd --reload
要确保一切正常,请运行以下命令:
ping -c 1 136.161.101.53
cat /var/log/maltrail/$(date +"%Y-%m-%d").log

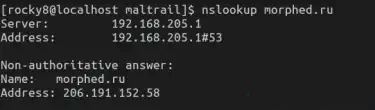
您还可以使用以下命令测试DNS流量的捕获:
nslookup morphed.ru
cat /var/log/maltrail/$(date +"%Y-%m-%d").log
配置Maltrail以访问门户网站
然后,您可以使用URL访问Web UI,地址格式为http://IP_Address:8338,如下图所示:
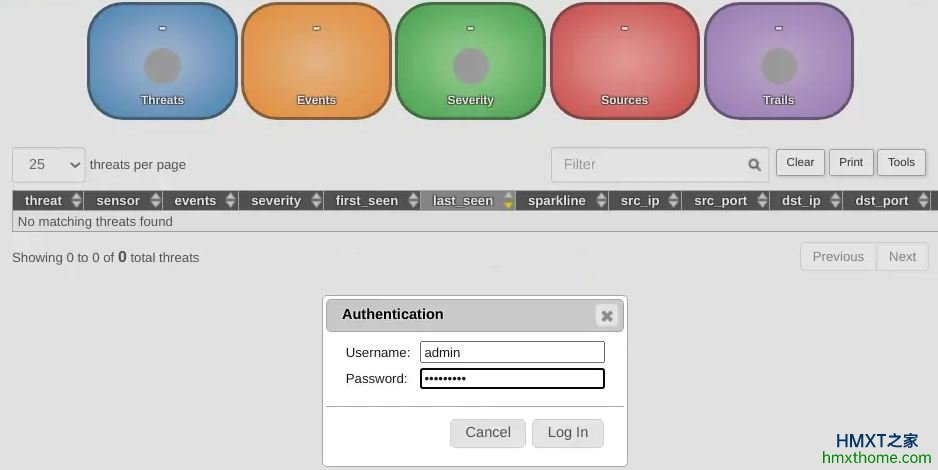
在此页面上,使用默认凭据(admin:changeme!)登录:
用户名:admin
密码:changeme!
经过身份验证后,您将看到下面的仪表板:
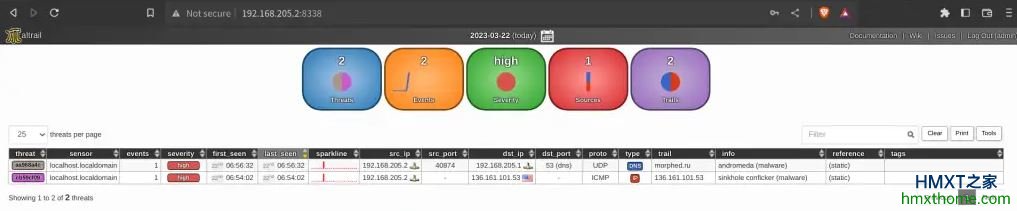
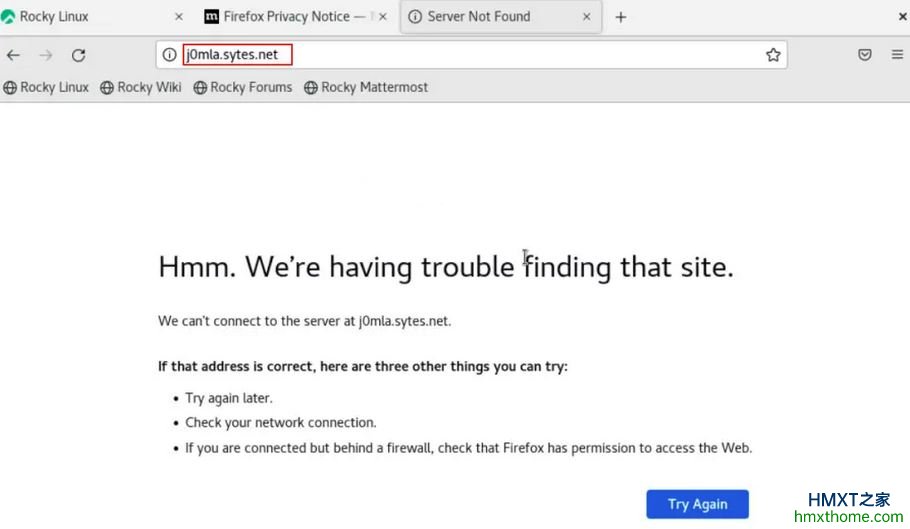
从我的仪表板上,可以看到两个威胁,这是我们之前测试过的威胁。现在,从我的系统中,我将尝试访问一个恶意网站,如下所示,这是浏览器的输出:
回到我的Maltrail网络用户界面,我会看到威胁的增加:
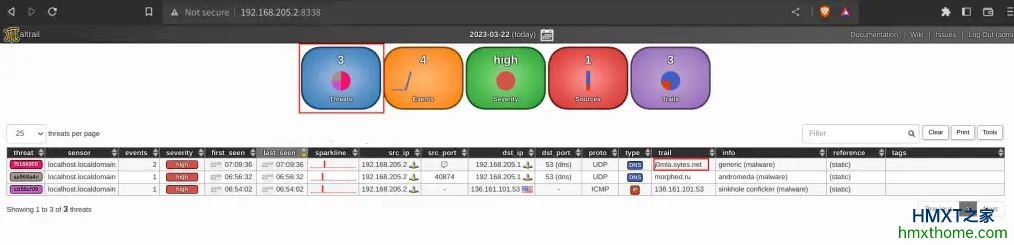
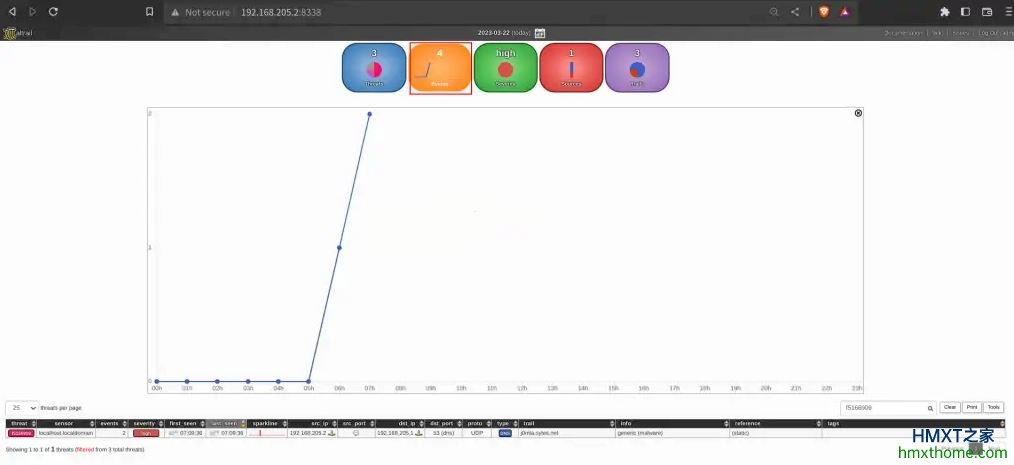
您可以查看有关网络流量的详细信息。例如,查看事件:
到这里,标志着配置Maltrail的成功并完成。可以随时使用Maltrail检测网络中的恶意流量了。
相关资讯


