更新时间:2023-05-14 10:28:12浏览次数:567+次
本文介绍如何使用Algo VPN在Ubuntu 22.04上安装和配置WireGuard和IPsec服务器。请按以下步骤进行操作即可达到目的。
第一步、安装所需的软件包
注:Algo是一组Ansible脚本,可以更容易地在本地或云中运行WireGuard和IPsec VPN。它旨在简化Wireguad VPN的安装,允许用户从任何设备连接,包括Android、Linux、OSX、iOS等。由于Algo是一个Ansible脚本,因此需要安装Python 3.8或更高版本。这可以使用以下命令来完成:
sudo apt update
sudo apt install -y --no-install-recommends python3-virtualenv libffi-dev libssl-dev git
安装后,请检查Python版本:
$ python3 --version
Python 3.10.6
此外,克隆Algo存储库:
sudo su -
git clone https://github.com/trailofbits/algo.git
安装Algo依赖项:
cd algo
python3 -m pip install -U pip virtualenv
python3 -m virtualenv --python=$(which python3) env
source env/bin/activate
python3 -m pip install -r requirements.txt
第二步、配置WireGuard和IPsec服务器
Algo允许您将Ansible脚本运行到远程主机或在本地机器上执行该脚本。下面,我们将在本地机器上运行脚本。但在此之前,我们需要为Algo做一些配置。
1、在Algo上创建用户
配置存储在config.cfg文件中。请使用编辑器打开文件:
vim config.cfg
在文件中,指定要在安装过程中创建的用户。对于本指南,我们将有4个用户,如下所示:
users:
- phone
- linux
- windows
2、禁用System-Resolved
为了使dnsmasq工作,我们需要禁用已解析的服务:
sudo systemctl disable systemd-resolved
sudo systemctl stop systemd-resolved
删除resolv.conf的符号链接:
sudo unlink /etc/resolv.conf
现在创建一个新的conf文件,如下所示:
$ sudo vim /etc/resolv.conf
ameserver 8.8.8.8
第三步、安装WireGuard和IPsec服务器
如上所述进行配置后,您就可以开始Wireguard部署了。安装过程将经历一系列问题。
开始安装:
./algo
按以下步骤进行:
PLAY [localhost] *************************
TASK [Gathering Facts] *************************
ok: [localhost]
TASK [Playbook dir stat] *************************
ok: [localhost]
TASK [Ensure Ansible is not being run in a world writable directory] *************************
ok: [localhost] => {
"changed": false,
"msg": "All assertions passed"
[Cloud prompt]
What provider would you like to use?
1. DigitalOcean
2. Amazon Lightsail
3. Amazon EC2
4. Microsoft Azure
5. Google Compute Engine
6. Hetzner Cloud
7. Vultr
8. Scaleway
9. OpenStack (DreamCompute optimised)
10. CloudStack (Exoscale optimised)
11. Linode
12. Install to existing Ubuntu 18.04 or 20.04 server (for more advanced users)
Enter the number of your desired provider:12
允许macOS/iOS客户端在连接到蜂窝网络/Wi-Fi时启用“VPN On Demand”:
[Cellular On Demand prompt]
Do you want macOS/iOS clients to enable "Connect On Demand" when connected to cellular networks?
[y/N]:y
[Wi-Fi On Demand prompt]
Do you want macOS/iOS clients to enable "Connect On Demand" when connected to Wi-Fi?
[y/N]:y
提供受信任的WiFi网络列表:
List the names of trusted Wi-Fi networks (if any) that macOS/iOS clients exclude from using the VPN
(e.g., your home network. Comma-separated value, e.g., HomeNet,OfficeWifi,AlgoWiFi):HomeNet
进行以下几种其他配置:
[Retain the PKI prompt]
Do you want to retain the keys (PKI)? (required to add users in the future, but less secure)
[y/N]:y
[DNS adblocking prompt]
Do you want to enable DNS ad blocking on this VPN server?
[y/N]:y
[SSH tunneling prompt]
Do you want each user to have their own account for SSH tunneling?
[y/N]:y
Local installation might break your server. Use at your own risk.
Proceed? Press ENTER to continue or CTRL+C and A to abort...:
提供用于证书验证的公共IP:
Enter the public IP address or domain name of your server: (IMPORTANT! This is used to verify the certificate)
[localhost]:Provide_Your_PublicIP/Domain_name
接下来,就是自动Ansible部署了。一旦部署完成,您将看到以下内容:
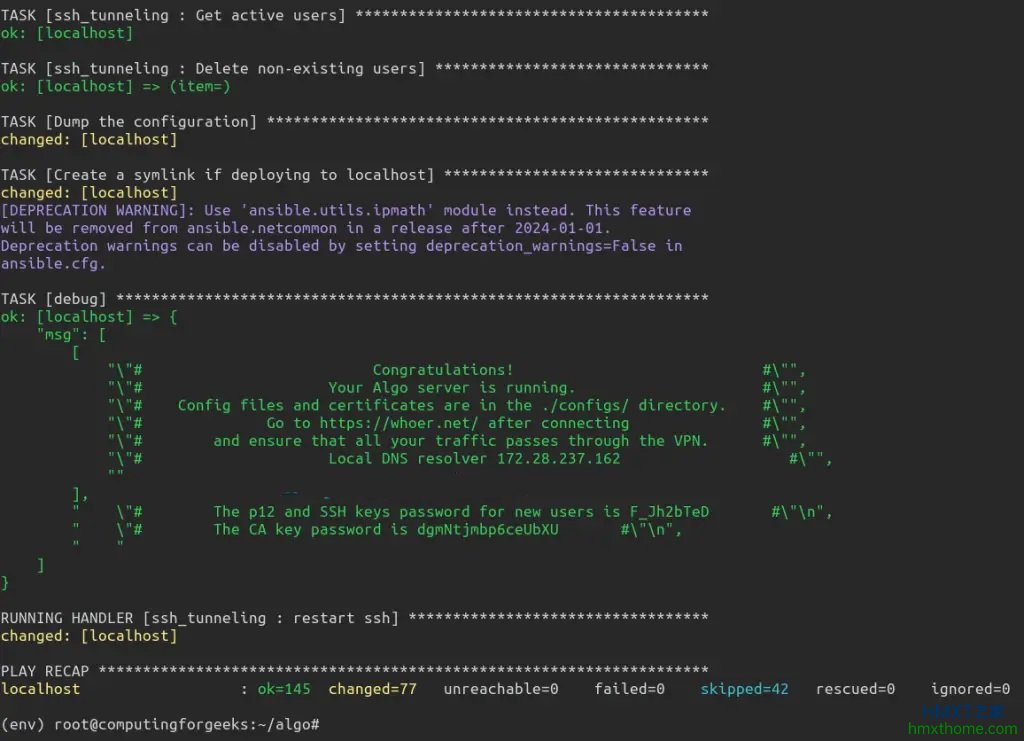
现在,您将在configs/IP_Address/wireguard/中创建连接配置文件。查看配置文件:
$ ls configs/localhost/wireguard/
apple linux.conf linux.png phone.conf phone.png windows.conf windows.png
您还可以查看任何配置文件的内容:
$ cat configs/localhost/wireguard/linux.conf
[Interface]
PrivateKey = qH7djC3t4njG6W2bxnSteNAUzyyuhpdQ21u+CHKjhXw=
Address = 10.49.0.3
DNS = 172.28.237.162
[Peer]
PublicKey = shbJpOr2Y2wNwzQyXwQJruac4JsYISlTefNC43l2RVY=
PresharedKey = fagxwHc1CaRAs80ii5Rx33THZDl56LqyAd388u/z7og=
AllowedIPs = 0.0.0.0/0,::/0
Endpoint = **********.compute-1.amazonaws.com:51820
配置文件包含设置Wireguard客户端所需的所有内容。PNG文件包含可以扫描以连接到VPN服务器的二维码。
如果您想在部署后添加用户,请编辑config.cfg并添加所需的用户。然后更新配置:
source env/bin/activate
./algo update-users
现在,我们将验证此服务器上是否已设置Wireguard:
sudo wg
样本输出:

第四步、配置Wireguard客户端
设置好Wireguard服务器后,我们可以配置VPN客户端以连接到它。要安装Wireguard客户端,请按照以下步骤操作。
当前可以从Wireguard安装说明页面在Linux和macOS上设置Wireguard客户端,地址在https://www.wireguard.com/install/。或者,使用软件包管理器安装WireGuard客户端。
在Debian/Ubuntu系统上,也可以安装以下软件包,以下命令适用于Ubuntu 22.04系统上:
sudo apt install openresolv
安装后,创建一个配置文件:
sudo vim /etc/wireguard/wgvpn.conf
在该文件中,将行添加到Wireguaard服务器上生成的配置文件中。例如,从linux.conf:
[Interface]
PrivateKey = qH7djC3t4njG6W2bxnSteNAUzyyuhpdQ21u+CHKjhXw=
Address = 10.49.0.3
DNS = 172.28.237.162
[Peer]
PublicKey = shbJpOr2Y2wNwzQyXwQJruac4JsYISlTefNC43l2RVY=
PresharedKey = fagxwHc1CaRAs80ii5Rx33THZDl56LqyAd388u/z7og=
AllowedIPs = 0.0.0.0/0,::/0
Endpoint = *********.compute-1.amazonaws.com:51820
保存文件并重新启动系统:
sudo reboot
系统重新启动后,使用以下命令启动VPN接口:
$ sudo wg-quick up wgvpn
[#] ip link add wgvpn type wireguard
[#] wg setconf wgvpn /dev/fd/63
[#] ip -4 address add 10.49.0.3 dev wgvpn
[#] ip link set mtu 1420 up dev wgvpn
[#] resolvconf -a wgvpn -m 0 -x
[#] wg set wgvpn fwmark 51820
[#] ip -6 route add ::/0 dev wgvpn table 51820
[#] ip -6 rule add not fwmark 51820 table 51820
[#] ip -6 rule add table main suppress_prefixlength 0
[#] nft -f /dev/fd/63
[#] ip -4 route add 0.0.0.0/0 dev wgvpn table 51820
[#] ip -4 rule add not fwmark 51820 table 51820
[#] ip -4 rule add table main suppress_prefixlength 0
[#] sysctl -q net.ipv4.conf.all.src_valid_mark=1
[#] nft -f /dev/fd/63
一旦启动接口,请验证它是否正在运行:
sudo wg
样本输出:
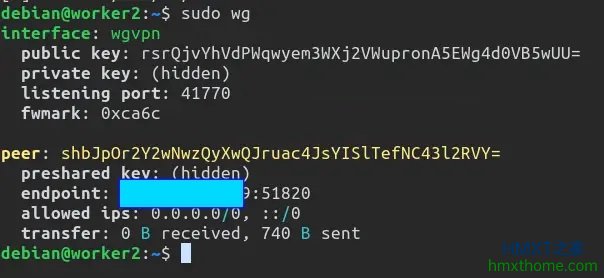
至此,配置Wireguard客户端完成,用户可随时将客户端连接到服务器了。
相关资讯


