更新时间:2022-12-19 10:45:22浏览次数:424+次
本文介绍在Linux操作系统上使用Puppet自动安装Graylog服务器的方法,支持Ubuntu、Debian、CentOS版本。Graylog是一个用于管理和聚合日志的免费开源工具,它用于根据收集的日志存储、分析和发送警报,此工具通常用于分析结构化和非结构化数据。
需要先安装和配置Puppet,以下为说明
本文要求在其系统上安装并配置Puppet。这涉及到设置Puppet服务器和连接到它的代理节点。最新版本的Graylog与Puppet >= 6.21.0 < 8.0.0兼容,可参考在Ubuntu 20.04上安装Puppet Master和Agent的方法。
配置好Puppet服务器和客户端后,验证连接:
$ sudo /opt/puppetlabs/bin/puppet agent -t
Info: Using environment 'production'
Info: Retrieving pluginfacts
Info: Retrieving plugin
Info: Loading facts
Info: Caching catalog for rocky-linux-8.localdomain
Info: Applying configuration version '1651833223'
Info: Creating state file /opt/puppetlabs/puppet/cache/state/state.yaml
Notice: Applied catalog in 0.01 seconds
安装所需的Puppet Modules
在本文中,我们不仅将安装Graylog模块,还将安装其他依赖性模块,如Java、MongoDB和Elasticsearch。
需要安装Graylog Puppet module。我们将首先安装Graylog模块:
$ sudo /opt/puppetlabs/bin/puppet module install graylog/graylog
Notice: Preparing to install into /etc/puppetlabs/code/environments/production/modules ...
Notice: Downloading from https://forgeapi.puppet.com ...
Notice: Installing -- do not interrupt ...
/etc/puppetlabs/code/environments/production/modules
Graylog模块与其他所需模块一起提供:
Puppet APT module–可以使用以下命令安装:
sudo /opt/puppetlabs/bin/puppet module install puppetlabs-apt --version <version-number>
Puppet standard library module–可以安装如下:
sudo /opt/puppetlabs/bin/puppet module install puppetlabs-stdlib --version <version-number>
接下来,安装MongoDB模块:
$ sudo /opt/puppetlabs/bin/puppet module install puppet-mongodb
Notice: Preparing to install into /etc/puppetlabs/code/environments/production/modules ...
Notice: Downloading from https://forgeapi.puppet.com ...
Notice: Installing -- do not interrupt ...
/etc/puppetlabs/code/environments/production/modules
要说明的是,这个模块与Debian 11系统不完全兼容。因此,如果您有Debian 11节点,在安装过程中可能会遇到错误。
要安装的另一个模块是Java模块。可以使用以下命令安装:
$ sudo /opt/puppetlabs/bin/puppet module install puppetlabs-java
Notice: Preparing to install into /etc/puppetlabs/code/environments/production/modules .
Notice: Downloading from https://forgeapi.puppet.com ...
Notice: Installing -- do not interrupt ...
/etc/puppetlabs/code/environments/production/modules
最后,安装Elasticsearch模块:
$ sudo /opt/puppetlabs/bin/puppet module install puppet-elasticsearch
Notice: Preparing to install into /etc/puppetlabs/code/environments/production/modules ...
Notice: Downloading from https://forgeapi.puppet.com ...
Notice: Installing -- do not interrupt ...
/etc/puppetlabs/code/environments/production/modules
使用以下命令列出已安装的Puppet modules:
$ sudo /opt/puppetlabs/bin/puppet module list --environment production
/etc/puppetlabs/code/environments/production/modules
/etc/puppetlabs/code/modules (no modules installed)
/opt/puppetlabs/puppet/modules (no modules installed)
使用Puppet安装Graylog Server
模块安装完成后,我们将继续创建一个清单,在单个节点上管理MongoDB、Elasticsearch和Graylog。
正在获取程序包版本:
Graylog版本:https://www.graylog.org/releases
系统要求,地址:https://docs.graylog.org/docs/installing(支持Elasticsearch、MongoDB、Java版本)
创建如下文件:
sudo vim /etc/puppetlabs/code/environments/production/manifests/init.pp
文件将包含以下行:
class { 'mongodb::globals':
manage_package_repo => true,
}->
class { 'mongodb::server':
bind_ip => ['127.0.0.1'],
ensure => 'present',
restart => true,
}
include ::java
class { 'elasticsearch':
ensure => 'present',
status => 'enabled',
version => '7.10.2',
restart_on_change => true,
config => {
'cluster.name' => 'graylog',
'network.host' => '127.0.0.1',
},
jvm_options => [
'-Xms512m',
'-Xmx512m'
]
}
class { 'graylog::repository':
version => '4.2'
}->
class { 'graylog::server':
package_version => 'latest',
config => {
'password_secret' => 'pmHuefc3sMv6SWN6wPoCss6hTy8vksYr1QkFmtVjChi1rdRr6s7FeqNJOrWOWlipMsfmFgqGJM8HLdpF3thwFA4QvLSPhC0O', # Fill in your password secret
'root_password_sha2' => '434e27fac24a15cbf8b160b7b28c143a67d9e6939cbb388874e066e16cb32d75',# Fill in your root password hash
'http_bind_address' => '0.0.0.0:9000',
'http_external_uri' => 'https://0.0.0.0:9000/',
}
}
在该文件中,用以下pwgenas替换生成的password_secret的值:
$ pwgen -N 1 -s 96
pmHuefc3sMv6SWN6wPoCss6hTy8vksYr1QkFmtVjChi1rdRr6s7FeqNJOrWOWlipMsfmFgqGJM8HLdpF3thwFA4QvLSPhC0O
root_password_sha2是为管理员用户生成的sha256密码:
$ echo -n "Enter Password: " && head -1 </dev/stdin | tr -d '\n' | sha256sum | cut -d" " -f1
Enter Password: Str0ngPassw0rd
样本输出:
434e27fac24a15cbf8b160b7b28c143a67d9e6939cbb388874e066e16cb32d75
在Debian/Uuntu系统上,应用清单时,MongoDB可能会出错。通过编辑清单以使用手动添加的MongoDB存储库,可以解决此错误。
例如,MongoDB 4.4存储库可以通过以下命令添加到Debian Buster中:
wget -qO - https://www.mongodb.org/static/pgp/server-4.4.asc | sudo apt-key add -
echo "deb http://repo.mongodb.org/apt/debian buster/mongodb-org/4.4 main"|sudo tee /etc/apt/sources.list.d/mongodb-org.list
sudo apt update
添加存储库及其GPG密钥并更新系统后,按如下方式编辑清单:
class { 'mongodb::globals':
manage_package_repo => false,
manage_package => true,
}->
class { 'mongodb::server':
bind_ip => ['127.0.0.1'],
ensure => 'present',
restart => true,
}->
class { 'mongodb::client':
}
....
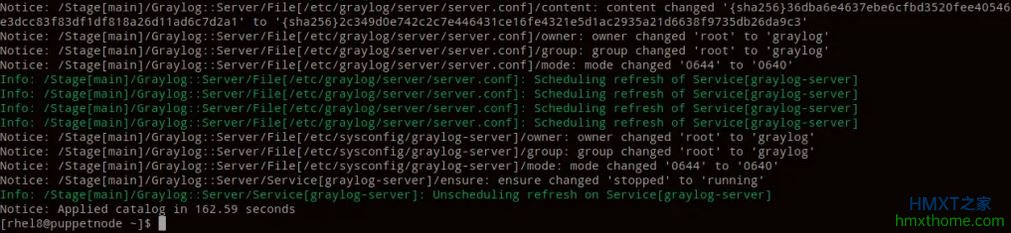
最后,在Agent上运行清单,如下所示:
sudo /opt/puppetlabs/bin/puppet agent -t
样本输出:
验证Elasticsearch是否在端口9200上运行:
$ curl -X GET localhost:9200
{
"name" : "graylog.example.com",
"cluster_name" : "graylog",
"cluster_uuid" : "tMJGsHuNS6OUgCk5q8RGBQ",
"version" : {
"number" : "7.9.3",
"build_flavor" : "default",
"build_type" : "rpm",
"build_hash" : "c4138e51121ef06a6404866cddc601906fe5c868",
"build_date" : "2020-10-16T10:36:16.141335Z",
"build_snapshot" : false,
"lucene_version" : "8.6.2",
"minimum_wire_compatibility_version" : "6.8.0",
"minimum_index_compatibility_version" : "6.0.0-beta1"
},
"tagline" : "You Know, for Search"
}
访问Graylog Web界面
此时,Graylog服务器正在侦听端口9000。允许此端口通过防火墙:
##用于防火墙
sudo firewall-cmd --add-port=9000/tcp --permanent
sudo firewall-cmd --reload
##对于UFW
sudo ufw allow 9000/tcp
现在使用URL访问Graylog web界面http://IP_Address:9000,如下图:
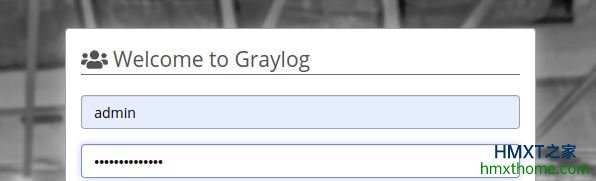
如上,请提供登录凭据,默认用户名为admin,密码为root_password_sha2设置的密码。在本例中,密码为Str0ngPassw0rd,也就是以上设置的密码。
成功验证后,您将能够看到下面的Graylog仪表板:
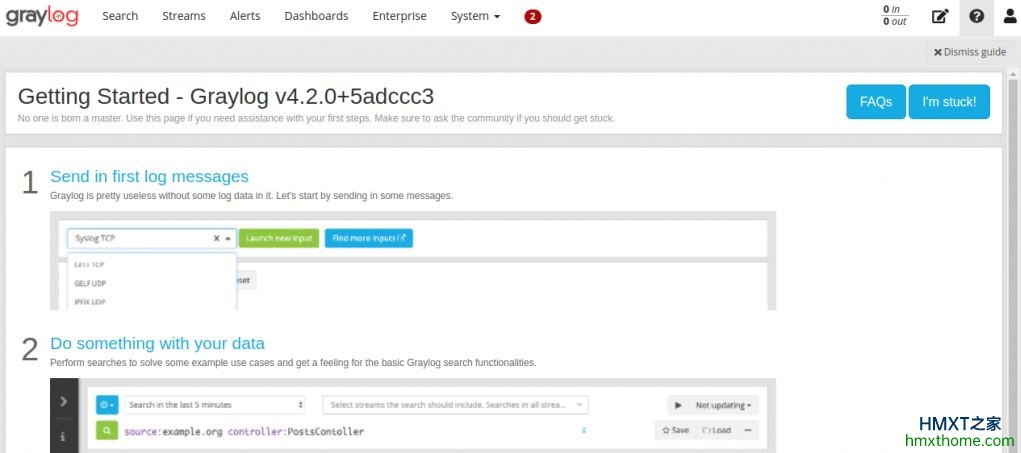
至此,整个Graylog安装过程全部完成,可随时用Graylog来操作需要的任务。
相关资讯


